The 6.9L and 7.3L IDI diesels employ a simple, mechanical type fuel injector with a typical service life in the 100,000 to 125,000 mile range. Component wear typically becomes apparent in the form of increased fuel consumption and excessive smoke under load. In extreme instances, or instances in which an injector has developed a fault, a rough idle or rough running condition may become present.
Worn fuel injectors can also contribute to increased fuel dilution and cylinder washing due to sticking and/or leaking nozzles. As a result of the wear patterns and mechanics of these fuel injectors, we typically recommend that they are replaced in complete sets or 8. There is, however, nothing inherently wrong with replacing a single fuel injector that is found to be faulty.
Identifying a single injector as the culprit is difficult, if not near impossible without removing all 8 injectors and having them bench tested by a qualified diesel injection specialist with access to such equipment.
In order to promote injector and injection pump longevity, a fuel additive should be used at every fill-up on all IDI diesels. These engines were engineered long before the ULSD (ultra low sulfur diesel) mandate in the U.S. and were designed to run on LSD (low sulfur diesel), which provides a greater level of lubrication to fuel system components than modern fuels. Amsoil Injector Clean + Cetane Boost, Opti-Lube XDP, and Archoil AR6200 have earned high remarks in our experiences and are highly cost effective.
6.9 & 7.3 IDI Fuel Injector Codes
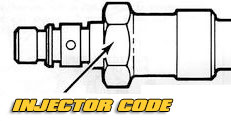
6.9L/7.3L IDI injector code location
All factory IDI fuel injectors have a code stamped into one of the (6) flats of the integrated hex structure used as a nut to remove and install the injector. The injector type and therefore code stamped into the injector is dependent on application year and type (naturally aspirated versus factory turbocharged). The table below summarizes the injector codes and there usage.
Injector Code |
Model Year(s) |
Notes |
A & AA |
1983 |
No longer manufactured. Engine serial number 59,207 and below. |
B |
1984 - 1992 |
Manufactured by Bosch |
BB |
1984 - 1992 |
Manufactured by Delphi |
D |
1984 - 1992 |
Manufactured by Stanadyne |
E |
1992.5 - 1994 |
Naturally aspirated 7.3L IDI diesel only |
G |
1992.5 - 1994 |
Factory turbocharged 7.3L IDI diesel only |
A, AA, B, BB Code Fuel Injectors
A and AA injectors were produced to identical specifications by two separate manufacturers. Similarly, B, BB, and D code injectors are built to the same specifications, but by different manufacturers (see chart above). A and AA injector codes, only used for one model year, have long been retired. B/BB/D code injectors feature an increased nozzle flow volume. Interestingly, B/BB/D series injectors have a lower ~1,875 psi opening pressure than the A/AA injector's ~2,075 psi opening pressure.
E & G Code Fuel Injectors
E and G code injectors are for 1992.5 to 1994 model year engines only. The injection pump on naturally aspirated engines was changed during this time and only E code injectors should be used. Likewise, only G code injectors are compatible in factory turbo applications. Do not attempt to put a naturally aspirated injector in a turbocharged engines. Engines from these model years will run best with the injectors they were designed with and if you're hunting for greater performance, injectors are not a viable solution for these applications.
7.3 IDI Fuel Injector Replacement Parts List
Part Description |
Part Number(s) |
Remarks/Notes |
BB/D code injector |
Delphi 6760301 |
[1] |
E code injector |
Delphi LJCK01101 |
[2] |
G code fuel injector |
Motorcraft CMR3RM |
[3] |
Injector return line kit, early style |
[4] |
|
Injector return line kit, late style |
[5] |
|
Anti-seize lubricant |
--- |
|
Recommended fuel additives |
Opti-Lube XDP |
[6] |
Glow plug repair kit |
[7] |
|
Glow plug connector set |
[1] BB/D code injectors for naturally aspirated (NA) engines model year 1983 - 1991.
[2] E code injector for naturally aspirated engines model year 1992 - 1994.
[3] G code injector for factory turbocharged 1993 and 1994 model year engines.
[4] Early style fuel injector return hose is 3/16" diameter. All 6.9L diesels use this system. 7.3L diesels used this system until 1989, engine serial 630772 - 634154.
[5] Late style fuel injector return hose is 1/4" diameter, header cap design is different than early style.
[6] The IDI diesel was not designed with ULSD in mind. Using a supplemental fuel additive is a cost effective solution to prolonging the life of ALL fuel system components.
[7] It is very easy to damage the glow plug connectors/wires as they become fragile and brittle with age; these are the replacement/repair options
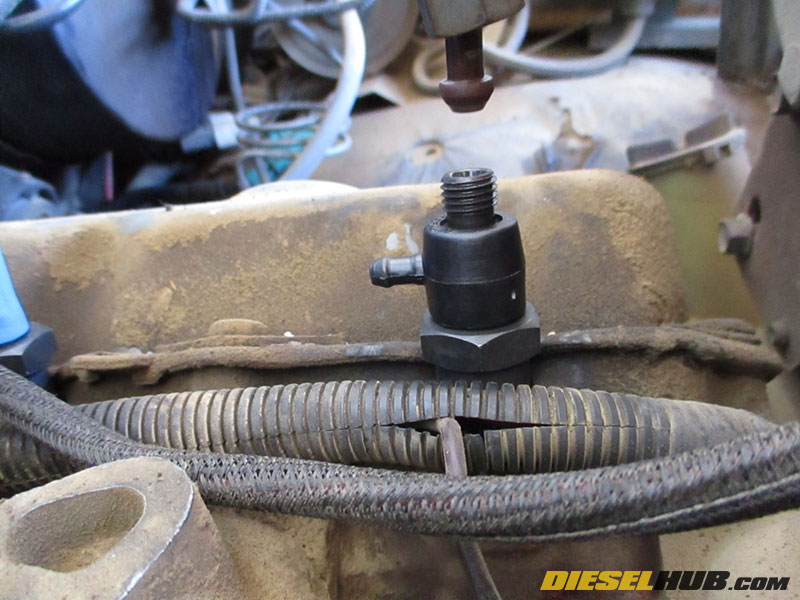
Identifying Early vs Late Style Injector Returns
The fuel return system recycles excess fuel delivered to the injection pump and fuel injectors back to the fuel tank. In lieu of such a system, excess fuel from both the low and high pressure fuel pumps would have no flow path and one or more parts of the fuel system would fail under intense pressure.
It is rare for the return system to plug or develop a restriction, however the hoses and injector caps/headers have a tendency to leak with age. Thus, replacing the return lines and servicing as required is extremely important anytime the system is touched. Never replace fuel injectors without replacing the return line headers (caps), hoses, and related o-rings.
The routing of the return fuel hoses is different for naturally aspirated and turbocharged engines, however the operation of the system is the same and replacing the various parts is largely intuitive; simply trace the system and replace it one piece at a time as you move from cylinder to cylinder. The components are also extremely inexpensive, thus there is no reason to take shortcuts.
There are two injector return cap styles, referred to simple as the "early" and "late" style. The two styles are not directly interchangeable, however an early style return system can be retrofitted to the late style. While there's some debate surrounding the topic, the consensus is that there is little reason to convert one system to the other.
The late style injector return cap was introduced during the 1989 model year to address concerns with fuel leaks. Early style return systems utilize a 3/16" hose while late style return systems feature 1/4" fuel hoses. The two styles are easily distinguishable and you can visually ensure that you are getting the correct parts for your application. The figure below will help you distinguish the early and late injector caps.
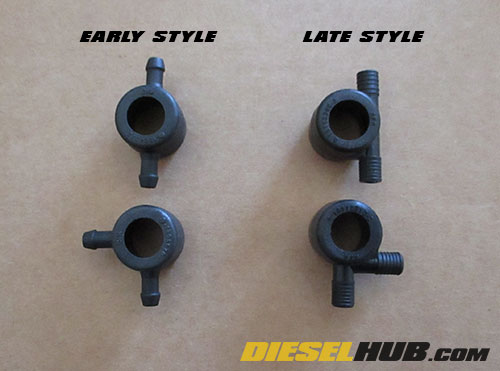
6.9L/7.3L IDI early vs late style fuel return caps
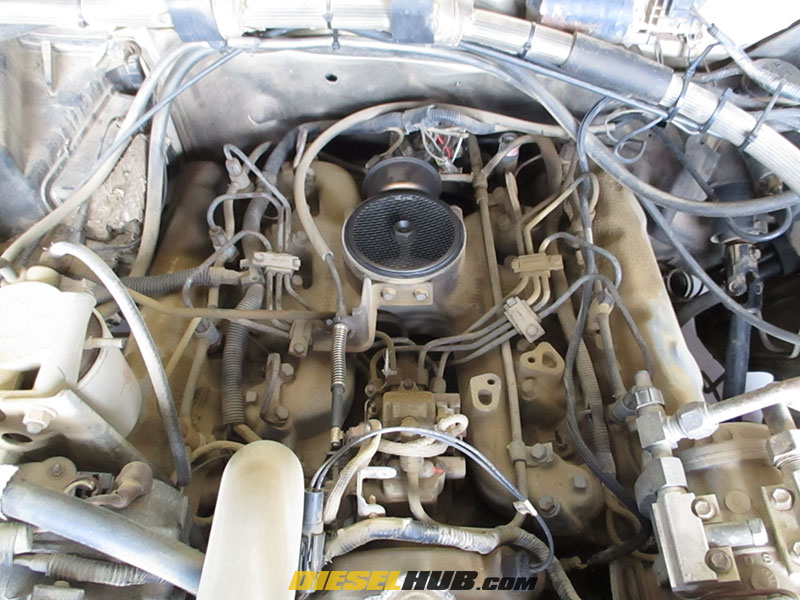
How to Replace the Fuel Injectors on a 6.9 or 7.3 IDI Diesel
Click any thumbnail to view fullsize, detailed image
• Disconnect both negative battery cables so that the vehicle cannot be started unintentionally.
• Remove the air cleaner assembly and cover the intake manifold opening with a clean rag/towel.
• Use a vacuum or air nozzle to clean any debris (dirt, dust, grime) from the area around each fuel injector to prevent it from falling into the cylinder when the injectors are removed.

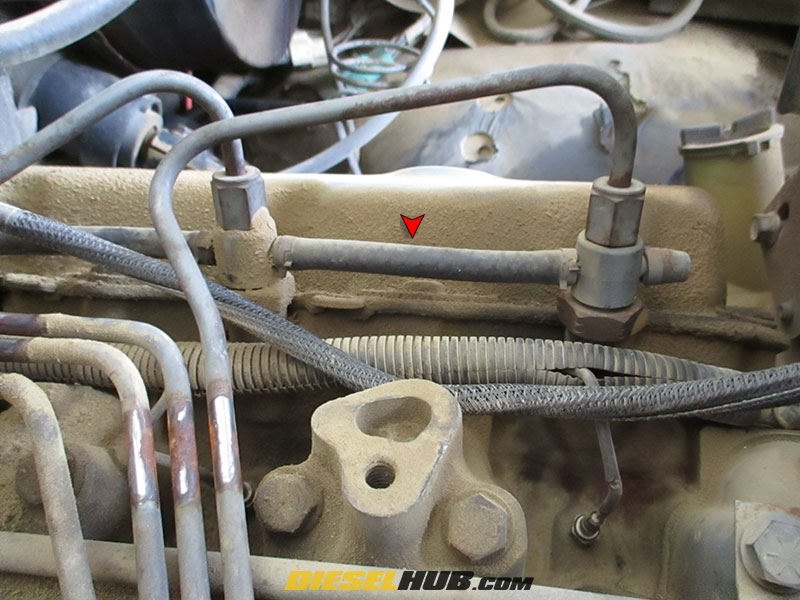
• Remove the (4) injector line clamps/vibration damper brackets (11 mm socket). Each fuel injector has its own dedicated fuel line connecting it to the injector pump, i.e. there are no shared injection lines between fuel injectors. There are (2) injector line clamps for the left bank of cylinders and (2) injector line clamps for the right bank of cylinders.
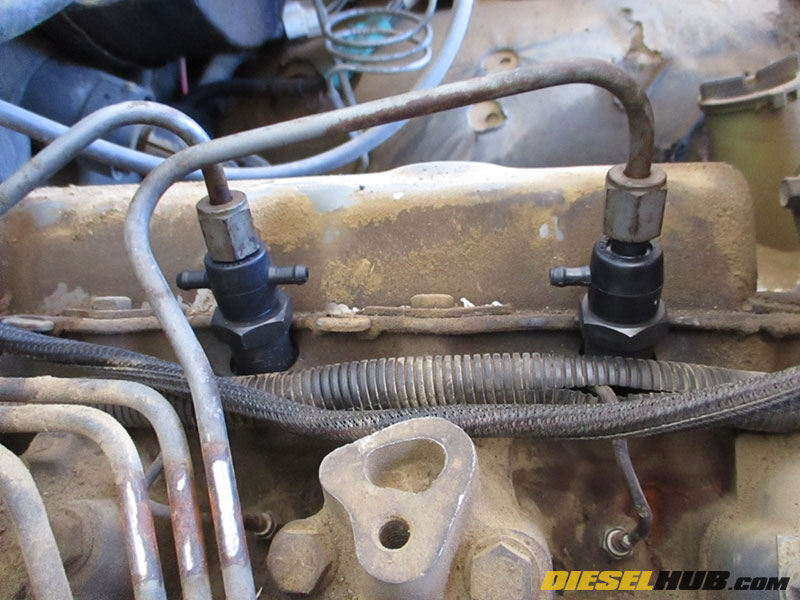
• Disconnect (or cut) the rubber fuel hose for each injector return line. Fuel return system hoses and headers should not reused - always replace when the injectors are removed.
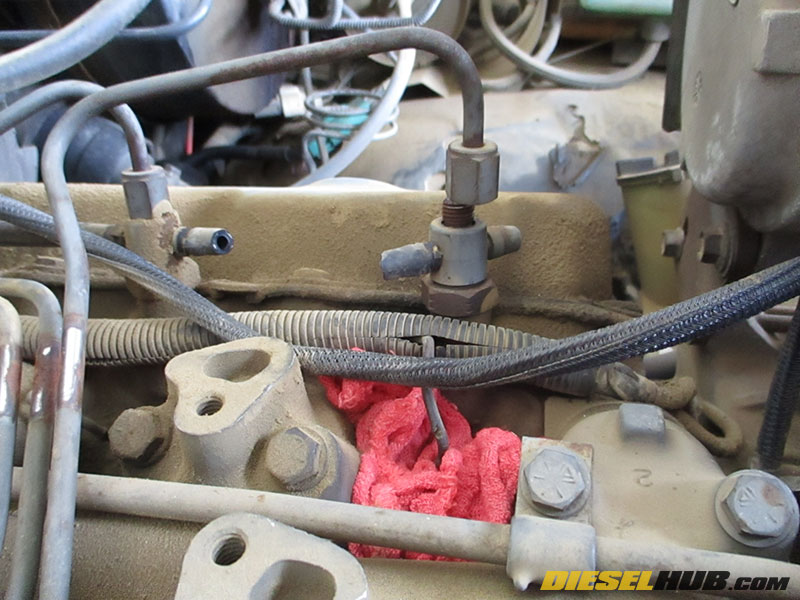
• Loosen, then fully remove the injector line from each fuel injector using a 16 mm flare nut wrench. Be extremely cautious not to kink any of the steel injector lines while handling them. You may wish to place a shop rag around the glow plug to collect any fuel that may leak when the injector line is removed.

• Remove the fuel return header from the injector by pulling upwards away from the injector while rotating left-to-right gently. You may need to maneuver the fuel line aside at this time; do not kink the steel line.

• Remove each fuel injector with a 1 inch deep socket.
• Ensure that the copper crush washer came out with the fuel injector (at the base of the injector nozzle assembly). If it did not, you will need to fish it out of the injector bore with a pick or small screwdriver.
• Clean the inside of the injector bore in the cylinder head using a shop vacuum. We typically reduce the size of the vacuum hose using heater hoses of various sizes and plenty of duct tape. Do not blow the bores with shop air; remove debris using a vacuum.
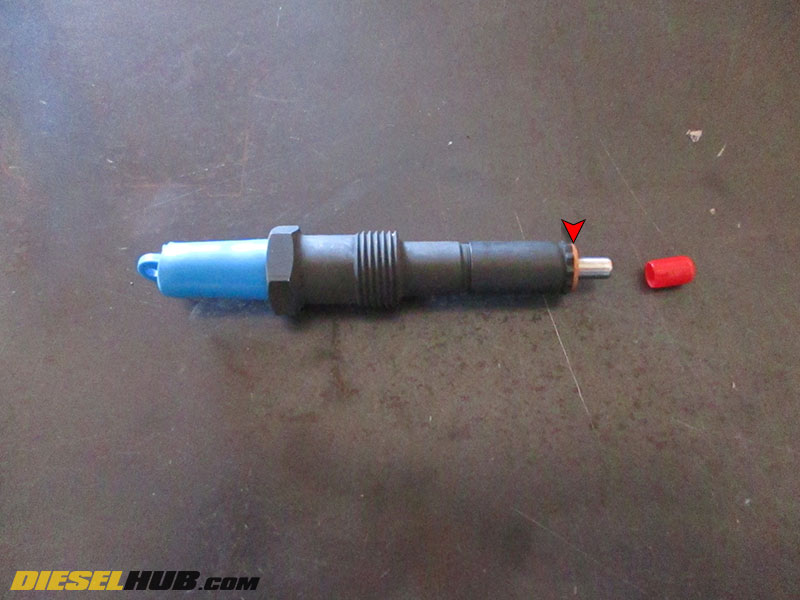
• Remove the protective cap from the nozzle of the new injector and install the copper crush washer. A small amount of anti-seize lubricant can be applied to one side of the copper washer in order to help it stick to the base of the injector nozzle during installation.
• Optional - apply a small amount of anti-seize lubricant to the injector threads. It will help the injector threads start easier and prevent corrosion, ensuring the injectors can be removed easily in the future.
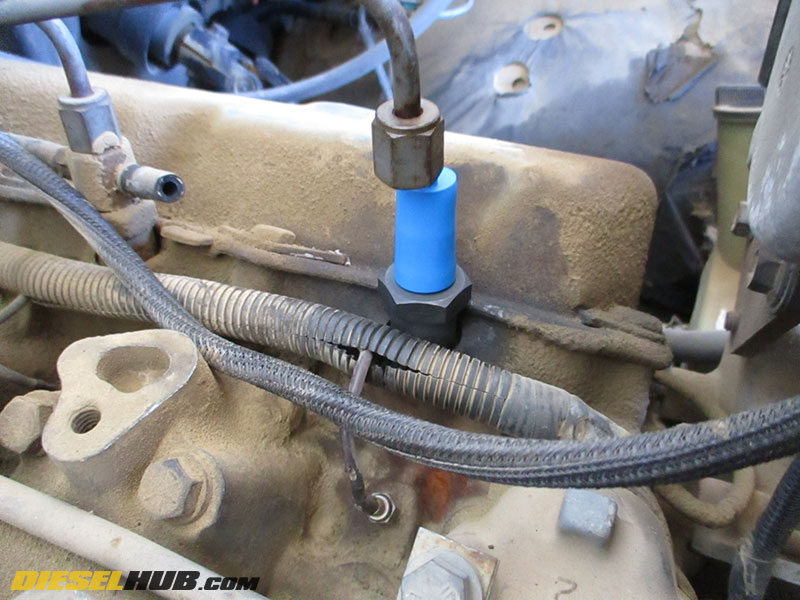
• Install the new fuel injector while ensuring that the copper crush washer remains secured to the base of the injector, i.e. does not fall into the cylinder head bore before being set into position. Always start the injector threads by hand, then torque to 35 ft-lbs.
Do not remove the protective cap at the top of the injector at this time. Repeat installation procedures for all 8 injectors.
• Using a clean rag, clean the tip (flared end) of each injector line.
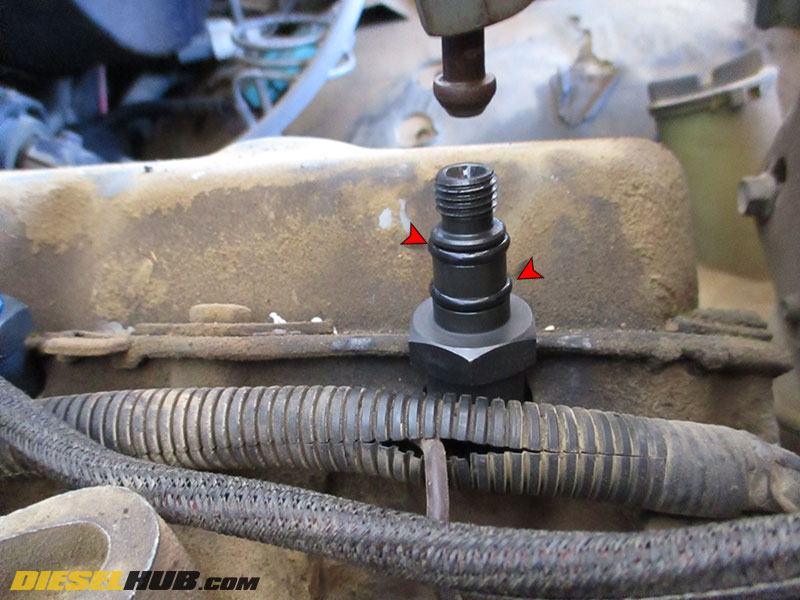
• Coat the injector return header o-rings (2 per injector) in clean engine oil, then install on each injector (reference image for proper position of the o-rings). Use caution as not to damage the injector o-ring on the sharp edge(s) of the threads and o-ring lands.
• Install each injector fuel return header after removing the protective cap from the top of the injector. Rotate the header left-to-right while pressuring downwards firmly until it seats completely.
Note that the fuel return headers are not all identical; 90 degree headers are used to cross from the left and right banks while a single nozzle header is used where the return system stops.
• Install the fuel lines (high pressure steel lines) onto the new injectors. Always start the threads by hand, then snug up with a flare nut wrench.
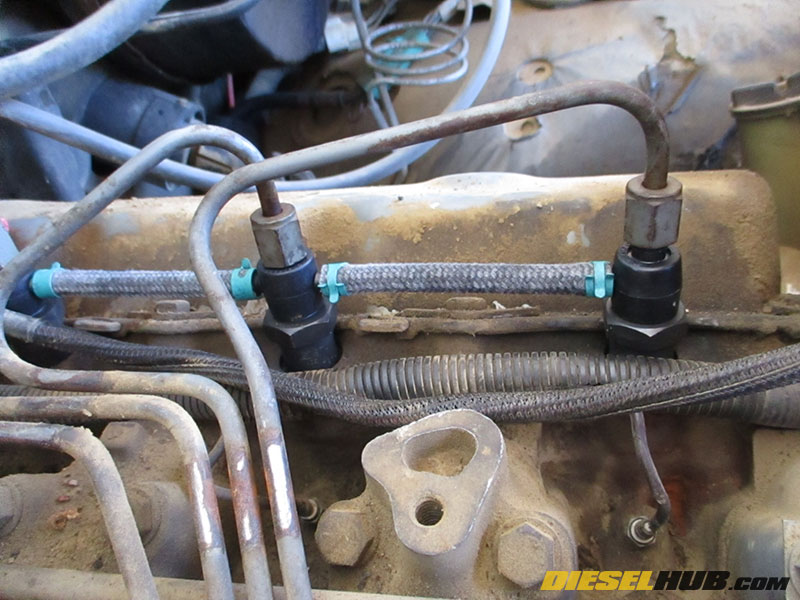
• Cut new fuel return lines to length and reassemble the return fuel system using the hose and clamps supplied in the service kit.
• Replace the fuel filter.
• Reinstall the air cleaner assembly and reconnect the negative battery cables.
• Crank the engine in 10 second cycles, allowing the starter to cool for 30 seconds between cycles. Check for fuel leaks between cranking cycles. It may take several attempts before the fuel system primes and the engine runs. The engine can be expected to run very rough until all air is worked out of the fuel system.