Trailer Wiring Basics
In the grand scheme of things, poor trailer wiring is a public safety concern. With modern weight ratings and capacities reaching inconceivable milestones, your average pickup can pull a substantial amount of weight down the road. As the weight of a trailer increases, the tow vehicle must increasingly rely on the trailers braking system. All it takes is one bad connection and your trailer's braking system will cease to function - thus, it is necessary to periodically inspect and test both the trailer and truck's wiring systems. Poor or corroded connections, loose fitting trailer connectors, bad grounds, and chaffed wires are common on aged trailers. These issues should be addressed so that all the trailer's functions - lights and brakes - work properly and reliably.
Standard 7 Pin Connector Pinout
6 pin and 7 pin connectors are extremely common on trailers that utilize their own electric brakes on one or more axles. On a 7 pin connector, the 7 circuits controlled by the towing vehicle are: 1) 12 volt + auxiliary power, 2) ground, 3) trail light/running lights 4), left hand turn signal and brake light, 5) right hand turn signal and brake light, 6) trailer brake control, 7) backup lights. The auxiliary power circuit is connected to the battery or alternator of the tow vehicle and is typically used to recharge batteries on trailers that have their own power system (travel trailers, dump trailers, trailers with winches, etc).
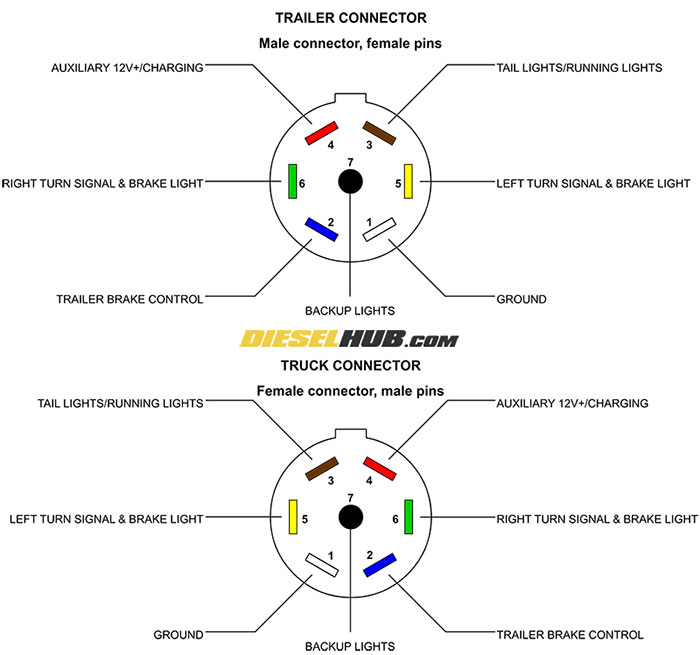
Note - ALWAYS use a multimeter to verify connector terminals and wire colors. Wire colors are NOT standardized between all manufacturers.
Trailer breakaway Switch Wiring
All trailers are equipped with chains connecting the tongue of the trailer to the bumper/receiver hitch of the tow vehicle. On vehicles with electric brakes, a breakaway switch is required so that in the event a trailer were to completely breakaway from the vehicle (or some idiot decided not to connect his safety chains) the trailer brakes would lock up and [hopefully] prevent a serious collision. On trailers that have their own battery supply (travel trailers, dump trailers, etc), this switch is wired to the trailer batteries. Trailers without their own battery supply require the installation of a breakaway a kit that has a small standalone battery. In both cases, the battery charge is maintained by the tow vehicle. The breakaway switch itself CANNOT rely on power directly from the tow vehicle, as in the event of a breakaway condition there would be no electrical contact between the tow vehicle battery and the trailer brake system. A typical breakaway switch circuit looks like this:
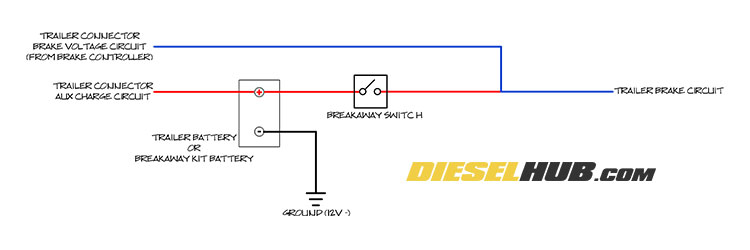
Typical trailer breakaway switch/breakaway kit circuit
The breakaway switch is a normally open switch. When the safety cord is pulled, the switch is closed and full voltage from the trailer (not tow vehicle) battery/breakaway kit battery is applied to the trailer brakes. So long as the breakaway switch is open, it has no affect on the trailer's braking system. The breakaway switch is NOT to be used as a parking brake for the trailer - it will drain the batteries on the trailer and tow vehicle. It is of utmost important to ensure that the tow vehicle's auxiliary charging circuit is functioning so that the breakaway kit/trailer battery charge is maintained.
Crimped vs Soldered Terminals & Splices
Both crimped and soldered joints are entirely sufficient in providing a sound connection between a wire and a terminal or two or more wires. Crimping is often preferred in environments that experience continuous vibrations or require a wire to flex as soldering tends to result in the solder "wicking" up the wire beyond the insulation, creating a stiff portion of wire in the vicinity of the terminal/splice. One might argue that this is avoidable by not over-soldering a joint. Crimping, however, only produces a reliable bond if it performed correctly with the proper tools and a connector properly sized to the wire gauge being used. While crimping may seem like a rudimentary process, it is common for connectors to be over-torqued, under-torqued, or selected improperly for the adjacent wire size. These all produce less than ideal connections that may fail.
Trailer Equipment and Part Numbers
For your convenience, the following table contains part numbers from common manufacturers for various products used or mentioned herein. You'll find that rewiring or repairing the wiring on a trailer is not an expensive endeavor and well worth the peace of mind.
| Description | Part Number | Notes |
| 7 pin trailer connector, 3 ft long | Hopkins 20042 | Common 7 pin spade connector, various lengths. Wire colors are not typical for many OEM applications, you will need to verify each circuit with a multimeter. |
| 7 pin trailer connector, 4 ft long | Hopkins 20043 | |
| 7 pin trailer connector, 6 ft long | Hopkins 20044 | |
| Tekonsha P3 Electric Trailer Brake Controller | Tekonsha Prodigy P3 | Tekonsha is the industry standard in brake controllers. While it has more features than you'll ever need, it's extremely easy to use, competitively priced, and performs well. |
| Trailer connector junction box | GPD JBO700 | Neatly packages connections between trailer connector pigtail and actual trailer wiring. Makes future replacement, maintenance, and troubleshooting significantly easier as all circuits are accessible within the junction box for both the truck and trailer side. Very cheap investment. |
| Trailer breakaway kit | Dexter ST-034-285-00 | For trailers with electric trailer brakes and no battery power. |
| Breakaway switch | Tekonsha BWCR2010-P | Required for all trailers with electric brakes. Applies full voltage to trailer brakes in the event the trailer detaches from the tow vehicle. |
| 20 amp circuit breaker | Curt 58350 | Auto reseting circuit breaker; trips when current draw exceeds amperage rating, automatically resets when current draw drops below rated amperage. Recommended for brake controller power and auxiliary recharge circuits - if there is an overload condition, the breaker will protect the circuit but won't leave you without trailer brakes since is will reset automatically. |
| 30 amp circuit breaker | Curt 59360 | |
| Klein multimeter | Klein CL800 | You can get a cheap multimeter for under $30, but this is by far one of the most versatile multimeter on the market at this price point. The inductive ammeter is a powerful tool in testing for parasitic draws and proper glow plug operation. |
7 Pin Connector Installation & Trailer Wiring Upgrade
Click any thumbnail to view fullsize, detailed image
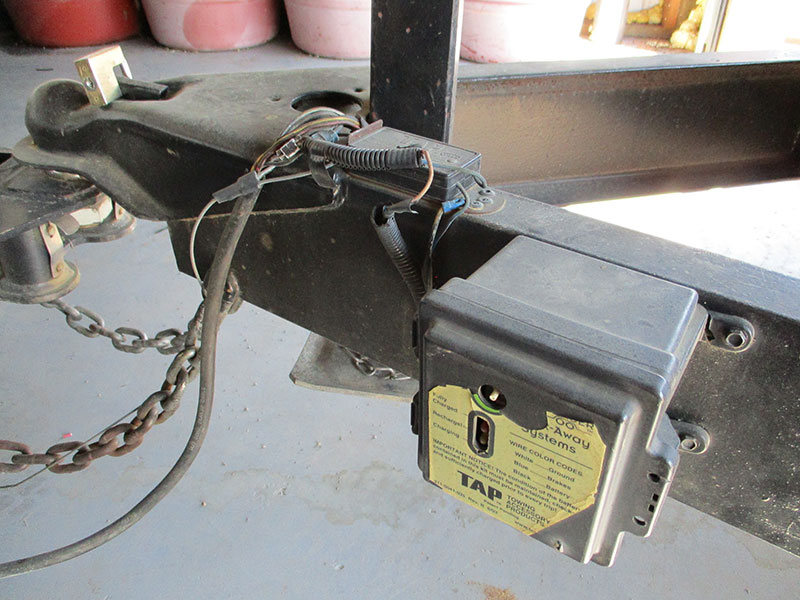
• This is the sad mess we're working with; the previous owner of this trailer was NOT an electrician, to say the least. The poor connections at the trailer plug were causing intermittent brake and light issues. This trailer is rated for 14,000 lbs (roughly 11,500 lbs of payload) thus reliable trailer brakes are extremely important.

• The first step was to gut the original wiring at the tongue of the trailer - the trailer connector pigtail, breakaway switch, and breakaway box (power supply).
• There's is no absolute industry standard with regard to the color of trailer wires. Always verify the function of each wire using a multimeter. Here, we identify which color wire of the old plug corresponds to each function (lights, brakes, turn signals, ground, etc) and make notes. The trailer wire colors match this plug, thus this helps ensure that the new pigtail is installed correctly.
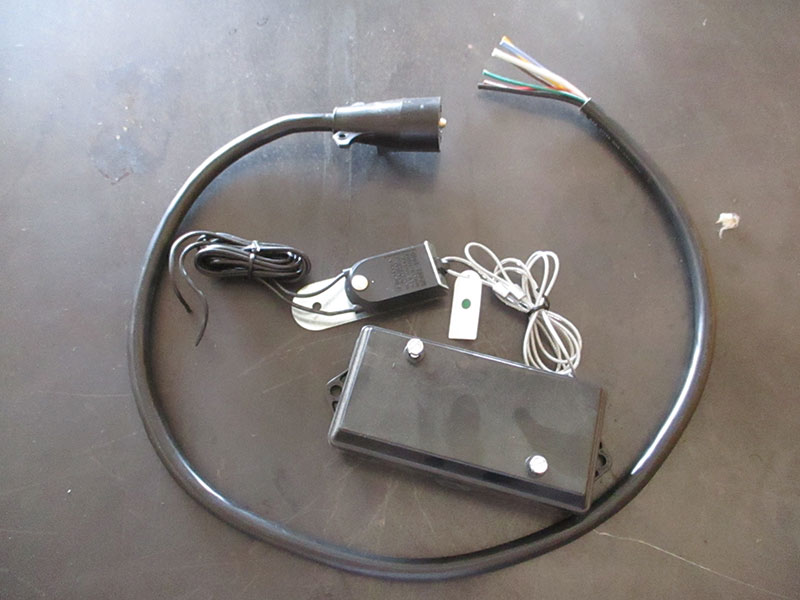
• We're starting fresh with a new connector pigtail, breakaway switch, and installing a junction box for a clean installation. A junction box also makes diagnostics much simpler should there be a problem in the future. They cost under $10 USD; you won't regret installing one.
Had this trailer not had its own battery supply, a breakaway kit (which includes a self contained battery supply) would have been required.
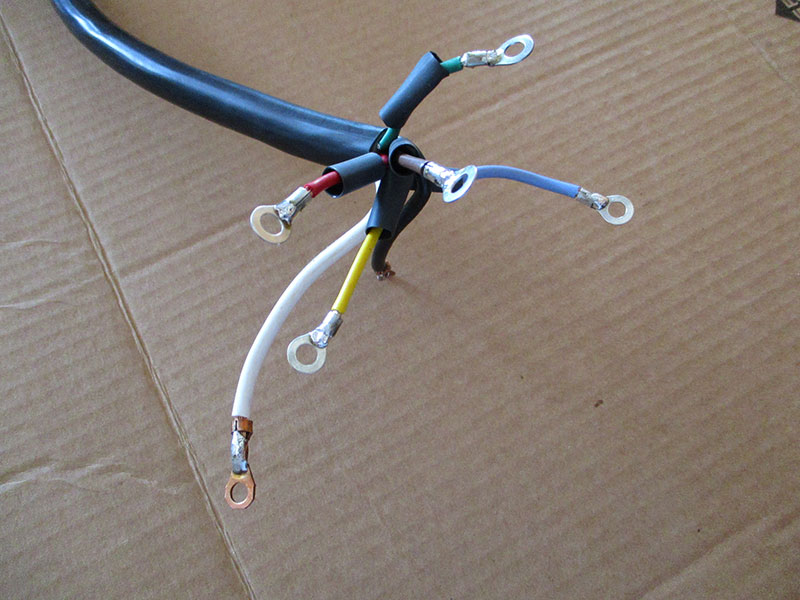
• With the replacement pigtail on the workbench, we stripped the wires, crimped on ring terminals that match the size of the studs on our junction box, soldered the terminals for good measure, and finished them off with heat shrink tubing to keep the terminals safe.
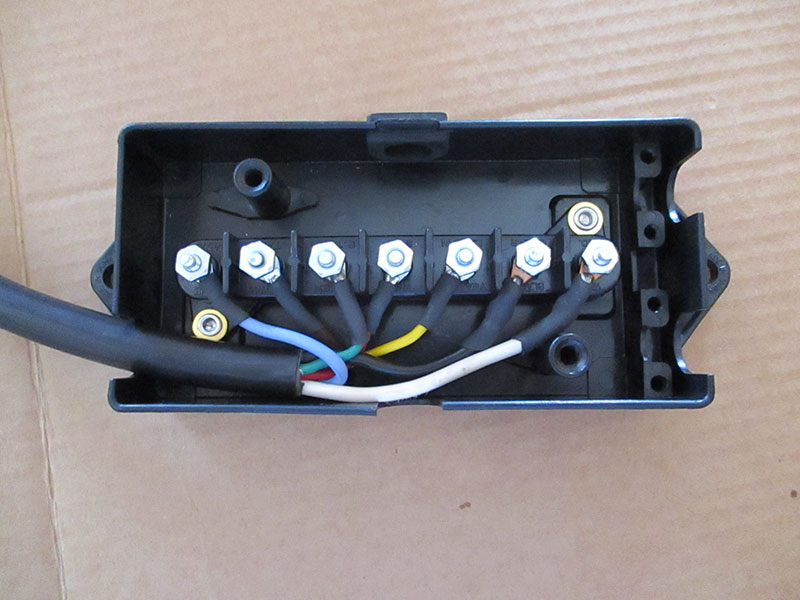
• The final step was to install the junction box, attach the connector pigtail and trailer wiring, and then install the breakaway switch. A dab of dielectric grease was used on the terminals to help fight corrosion.
