Applicable Models:
2017 - current Ford F-250, F-350, F-450, F-550 Super Duty
Applicable Engine(s):
6.7L Power Stroke diesel V-8
Fuel Filter Service Intervals:
Replace fuel filters every 22,500 miles or as indicated by the instrument cluster display message under normal service conditions
Replace fuel filters every 15,000 miles/6 months when using biodiesel blends or operating under severe service conditions
6.7 Power Stroke Fuel Filter Information
Fuel filter replacements are essential service procedures for any diesel engine, but especially for modern engines like the 6.7L Power Stroke that rely on extremely high pressure and precise fuel delivery equipment. All 6.7L Power Strokes employ the infamous and often problematic Bosch CP4.2 injection pump. While poor filtration is not typically the primary cause of a CP4 failure, fuel contamination and restriction can be detrimental to the reliable operation of this injection pump. Great care must be taken when replacing the fuel filters to ensure that the pump is properly primed and fuel delivery is free of air pockets before starting the engine.
Ford recommends replacing the fuel filters at 22,500 mile intervals or as instructed by the instrument cluster display message under normal service conditions. For those operating under severe service conditions or using biodiesel fuel blends, Ford recommends replacing the fuel filters every 15,000 miles or 6 months, whichever comes first.
Priming the Fuel System on a 6.7 Power Stroke
An electric fuel pump is responsible for delivering fuel to the CP4 injection pump, thus the system can be primed without cranking the engine. Any time that the ignition switch is placed in the "RUN" or "ON" position, the fuel pump is powered on and delivers fuel through system for a short duration. During this 10 to 15 second duration, the fuel pump can be heard as fuel is being distributed through the system. As such, priming the fuel system is as simple as cycling the key to the "RUN" position until the fuel pump stops running (generally 10 to 15 seconds), returning the key to the "OFF" position, and repeating the process 10 to 12 times. If the engine sputters, stalls, or runs rough, the system was not primed adequately and the number of cycles should be increased following subsequent fuel filter replacements.
The 6.7L Power Stroke features two fuel filters, one of which is chassis mounted and the other of which is engine mounted. The chassis mounted fuel filter also acts as the fuel-water separator, which can be drained independently without necessitating replacing the filter. In fact, we recommend draining the fuel-water separator between and during each oil change interval , or more frequently if you've previously found water in your fuel. After draining the fuel-water separator, prime the fuel system per the procedures outlined above.
The CP4 injection pump is particularly susceptible to contaminated fuel and will wear rapidly if there is water present in the fuel supply. Although we'd like to believe that the fuel-water separator is 100% effective, it is highly unlikely that all water is removed from the fuel before it is delivered upstream to the injection pump. Additionally, an overburdened fuel-water separator may reintroduce small quantities of water back into the fuel stream.
Fuel Quality Inspection
Inspecting fuel drained from the fuel-water separator is a preferred practice as it indicates the fuel quality and may help identify sources of contamination before severe damage is done to the fuel system. Always drain the fuel-water separator into a clean container so that the fuel can be inspected. Figures 1, 2, and 3 below identify the appearance of clean diesel fuel, diesel fuel with normal (of little concern) water intrusion, and highly contaminated (water emulsified) diesel fuel. Note that all three of these samples, even the highly contaminated fuel in figure 3, were drained from fully operation vehicles.

Note the clarity and color of normal on-highway diesel fuel

Note that the water remains separated from the diesel fuel at the bottom of the container
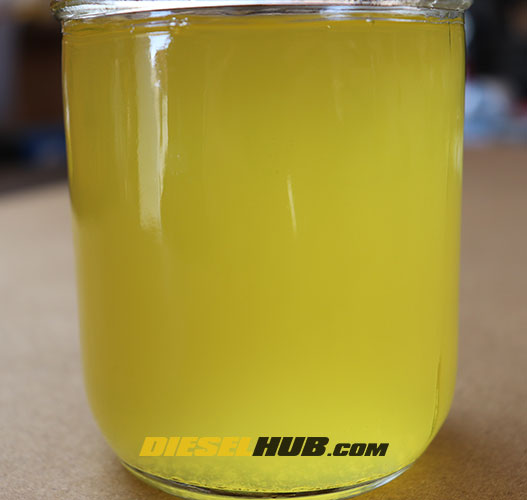
Note the cloudiness and almost milky color
Water emulsified fuel is a sign of severe contamination and will cause fuel system damage. The fuel tank will need to be drained of all contaminated fuel and the fuel system flushed with clean diesel. Additionally, the source of such contamination (outdoor fuel storage tanks, for example) should be found and appropriate steps taken to ensure that such fuel is not added to the vehicle tank again. Diesel fuel will draw moisture from the surrounding atmosphere and thus the small droplets in figure 2 are not necessarily a cause for concern. If the water-in-fuel sensor is illuminated between service intervals or the fuel-water separator appears overburdened with water between service intervals, there may be a source of contaminated fuel.
Fuel Additives for the 6.7 Power Stroke
As proponents of supplemental diesel fuel additives, we treat every tank in every vehicle and piece of equipment that's in our fleet, regardless of age, mileage, or fuel system type. While opponents suggest that these products are little more than "snake oil", our own experiences prove otherwise and the benefits largely outweigh the additional operating cost. While many of these products suggest improved fuel mileage, drivers should not be discouraged if they do not see these savings at the pump.
The primary benefit and, in our opinion the predominant purpose of a supplemental diesel fuel additive is to increase the lubricity of the fuel for the health of the fuel system. Increasing the lubricity of the fuel reduces wear and scarring in fuel injectors and injection pumps, thereby extending their life (for some, substantially). Today's sophisticated fuel system components operate at high pressures under demanding conditions and they are particularly expensive to repair, in terms of both labor and parts cost. While a supplemental fuel additive is not a cure-all solution that guarantees against fuel system component failures, they provide an additional layer of protection at the cost of cents, not dollars, per gallon of fuel.
Having tested various fuel additives extensively, Amsoil and Archoil products stand out as our top picks. Our 6.7L Power Stroke fuel additive test spanned approximately 2 years and 25,000 miles of driving. Both products delivered 5 to 7 percent fuel mileage improvements, reduced regeneration cycles, and no indication of an unhappy CP4 pump (knock on wood). Respective products from these manufacturers are tabulated in the parts list below.
6.7 Power Stroke Fuel Filter Parts List
| Part Description | Part Number(s) | Remarks |
| Fuel filter kit | Motorcraft FD4625AA | [1] |
| Diesel fuel conditioning module assembly | Motorcraft FD1166 | [2] |
| Fuel-water separator drain valve | Ford HC3Z-9J305-A | [3] |
| Water-in-fuel sensor | Ford HC3Z-9T321-B | [4] |
| Recommended fuel additives | Amsoil All-in-One diesel fuel additive Amsoil Injector Clean + Cetane Boost Archoil AR6500 diesel treatment |
[5] |
[1] - Includes chassis and engine mounted fuel filters, all required gaskets
[2] - Chassis mounted filter housing assembly; replace if damaged
[3] - Replace drain valve if leaking/won't seal
[4] - Replace water-in-fuel sensor if probes show signs of corrosion
[5] - Highly recommend all 6.7L Power Stroke owners use an appropriate fuel additive with every tank of diesel
How to Replace the Fuel Filters on a 6.7 Power Stroke
Click any thumbnail to view fullsize, detailed image
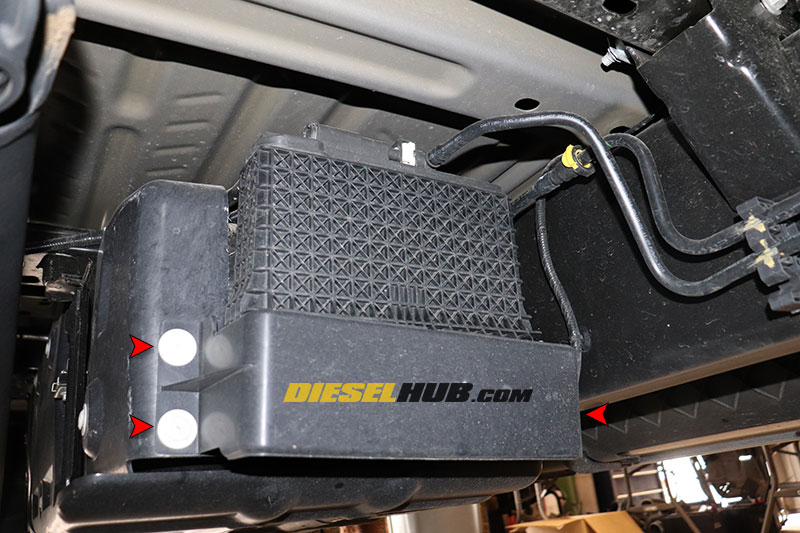
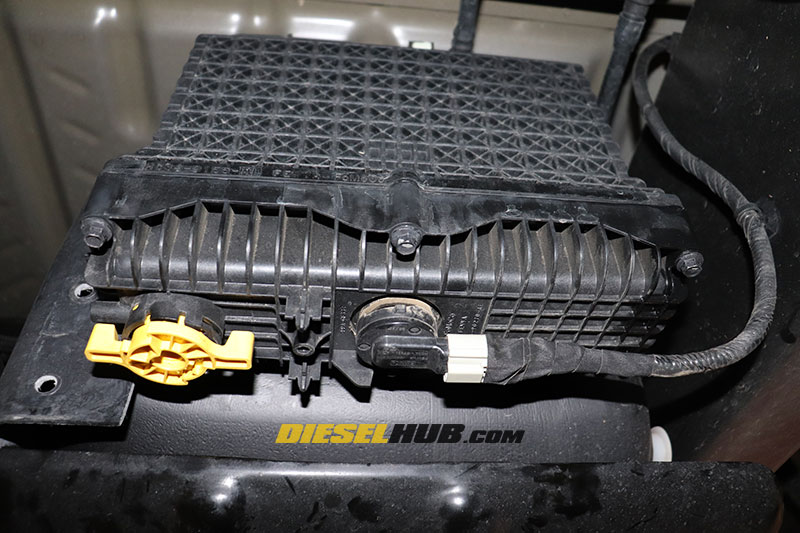
• Locate the diesel fuel conditioner module, which houses the secondary fuel filter. The location of the fuel filter is dependent on the cab configuration and bed length of your vehicle, but it will be mounted in front of the fuel tank, to the left side of the fuel tank, or to the right side of the fuel tank. On chassis cab trucks with dual tanks, the fuel filter will be mounted to the right hand side of the midship fuel tank.
• Remove the plastic shroud protecting the fuel-water separator drain valve and water-in-fuel sensor; it is secured by (3) reusable plastic clips that can be removed using a flathead screwdriver or body clip removal tool.
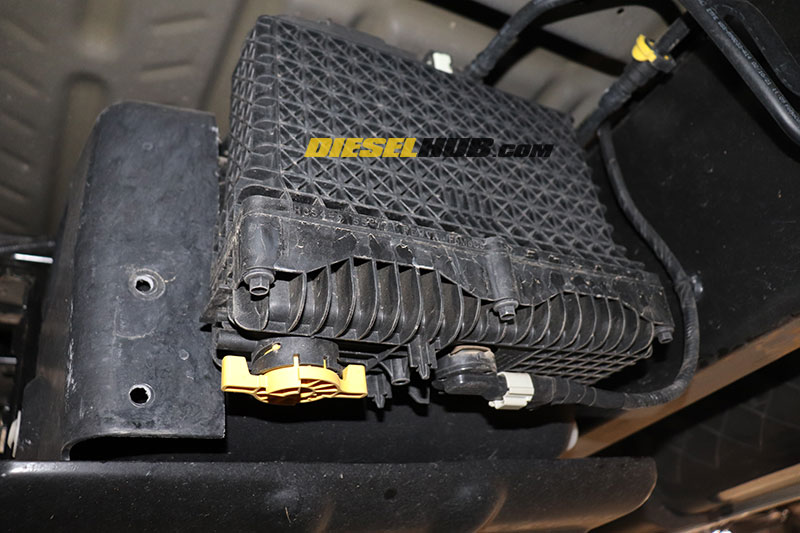
• With the shroud removed, the drain valve and water-in-fuel sensor are visible. Note that you could theoretically leave the shroud in place, however this increases the chance of contamination when the filter is removed, particularly if the shroud has collected dust, dirt, debris, or road grime.
• Disconnect the water-in-fuel sensor electric connector and position it aside and out of the work area.
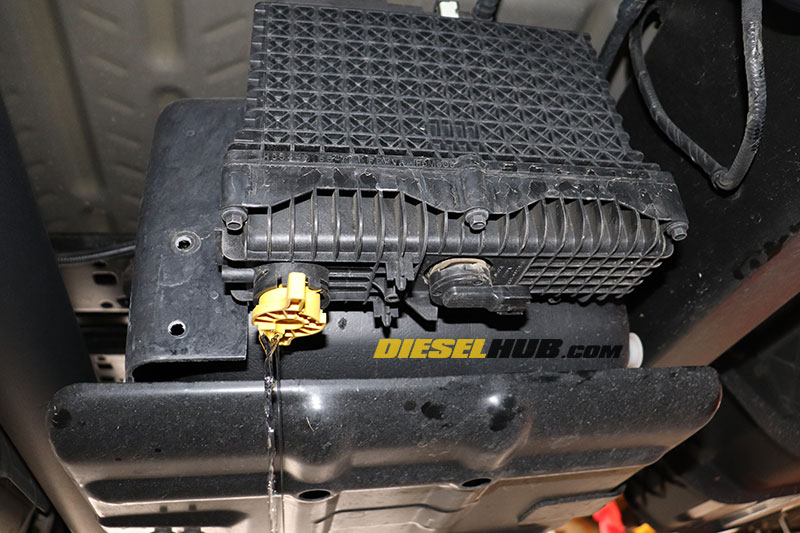
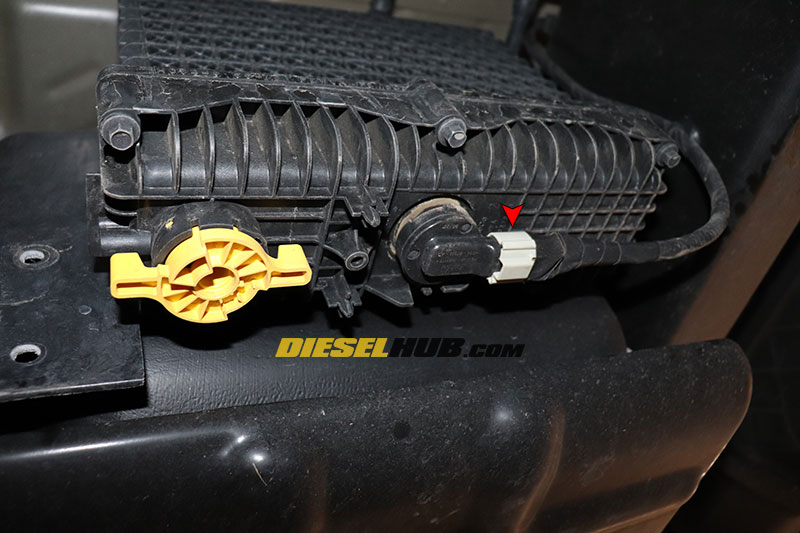
• Place a suitable drain pan or container below the fuel drain valve, then rotate the valve counter-clockwise until it stops (~ 1/4 turn) and fuel begins to drain.
• We recommend catching the drained fuel in a clean, clear container (i.e. Mason jar) to inspect fuel quality.
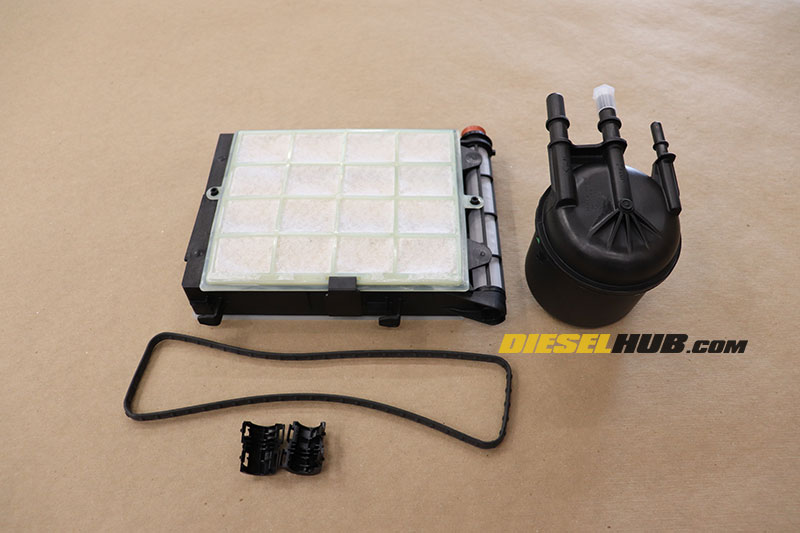
• While the diesel fuel conditioner module is draining, unpack the contents of your fuel filter service kit. It will contain a new fuel conditioner module filter and gasket, primary (engine mounted) fuel filter canister assembly, and fuel line clip release tool with instruction pamphlet.
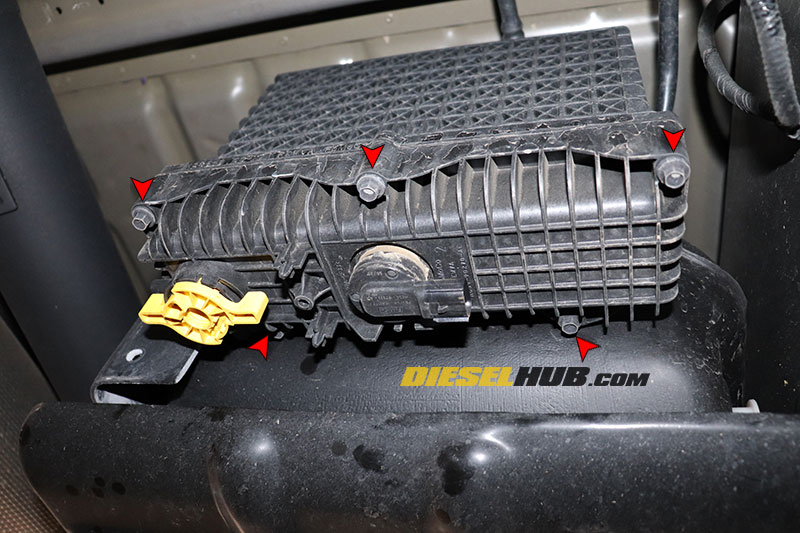
• Once the diesel fuel conditioner module has drained completely, close the drain valve and remove the (5) hex headed screws securing the base with an 8 mm socket. Once the screws have been loosened completely, the base and fuel filter assembly will slide down and out of the housing.
• Place the fuel filter assembly on a clean workbench.
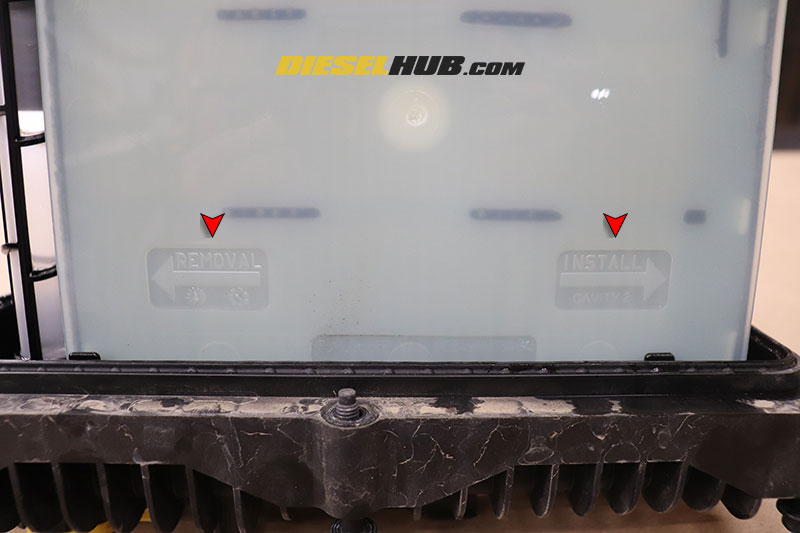
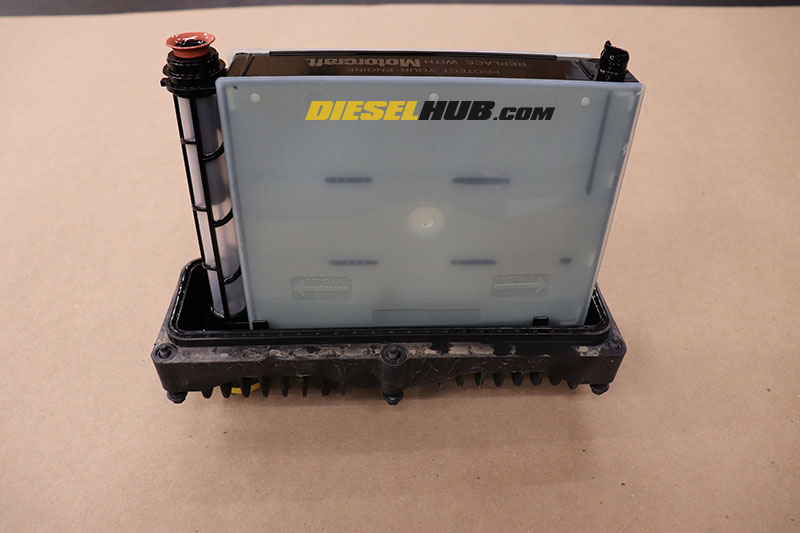
• Note that the directions for removing and installing the fuel filter into the base are imprinted on the body of the fuel filter. Slide the fuel filter to the left and pull upwards once it clears the clips in the base to remove.

• Discard the old fuel filter and remove the fuel filter base gasket.
• Inspect the bottom of the filter base for metallic debris, which would indicate a failing injection pump. A few fine particles is not cause for concern, but a collection of shiny metallic particles could be the start of a CP4 injection pump failure.

• Thoroughly clean the base mounting (sealing) flange of any dust or dirt to reduce the chances of contaminants entering the filter housing.
• Lubricate the fuel filter base gasket with clean motor oil, then install it in the base.
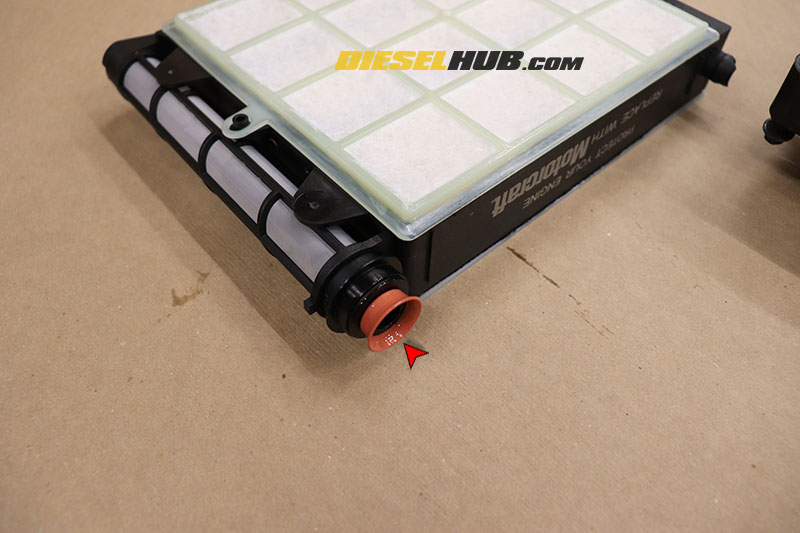
• Lubricate the rubber gasket (pictured) on the fuel filter assembly with clean motor oil.

• Install the new fuel filter assembly into the base by sliding it to the far left until it seats downwards completely against the base, then sliding right until it is secured by the clips in the base.
• Reinstall the fuel filter assembly in reverse order, tightening the (5) screws in an alternating pattern starting with the inner most screws. Snug the bolts and verify that the flange is mounted flush and that the gasket was not pinched. Final torque on the bolts is not to exceed 84 in-lbs. Do not overtighten, the plastic threads can easily be damaged.
• Reconnect the water-in-fuel sensor connector and reattach the diesel fuel conditioner module shroud. Verify that the drain valve is closed completely.
• Turn the key to the "RUN" position (DO NOT START!) to allow the low pressure fuel lift pump to begin pumping fuel through the system. After 10 seconds, turn the key to the "OFF" position. Repeat this step 5 to 10 times before changing the engine mounted fuel filter. Check for leaks around the diesel fuel conditioner module.
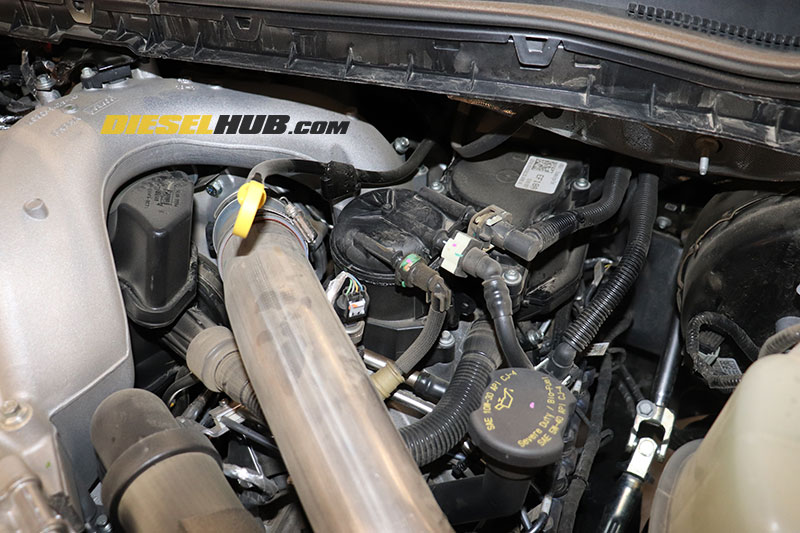
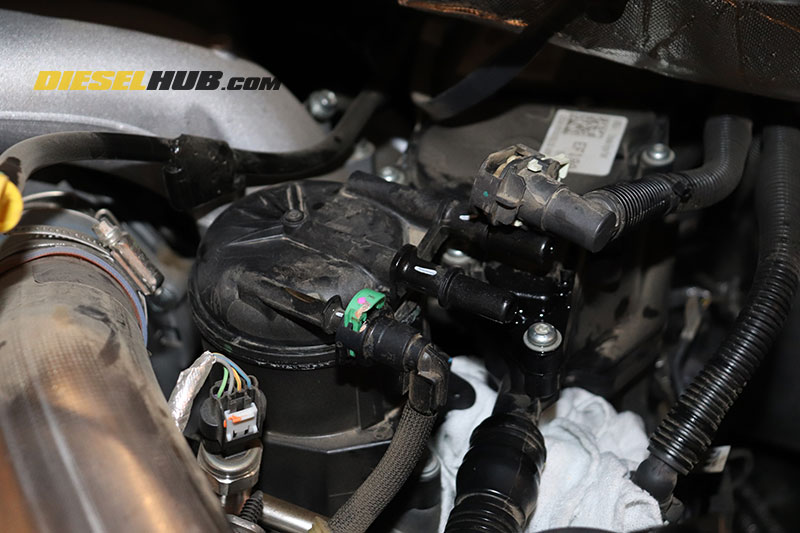
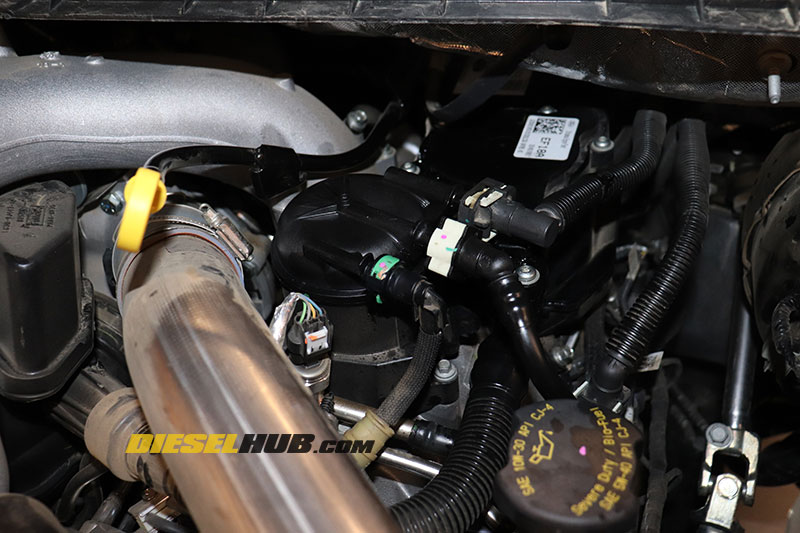
• Locate the primary (engine mounted) fuel filter mounted to the driver side of the engine behind the hot-side intercooler tube.
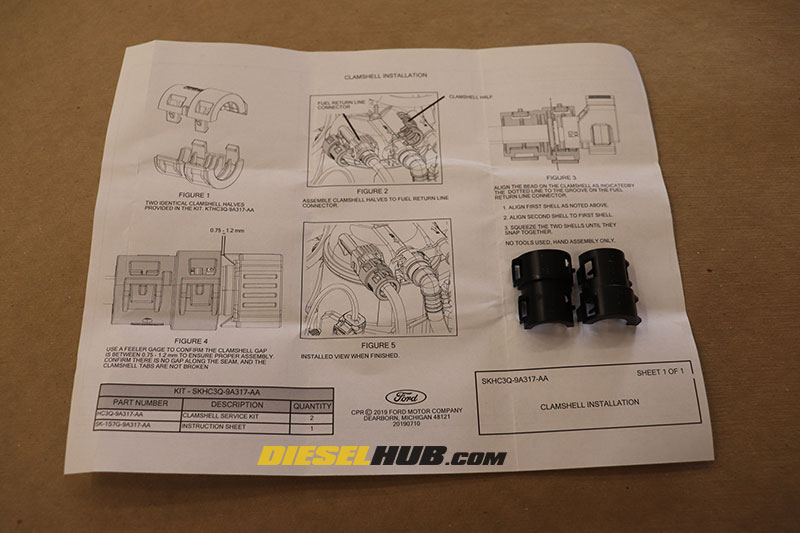
• Browse through the informational pamphlet included in the fuel filter kit; if the fuel lines attached to the filter canister match the description outlined in this pamphlet, follow these instructions to remove the fuel lines and disregard our instructions below. If your fuel lines do not match the description of those in the pamphlet, you will not use the provided plastic clip and will instead follow our instructions below.

• Place a few shop rags around the base of the fuel filter canister.
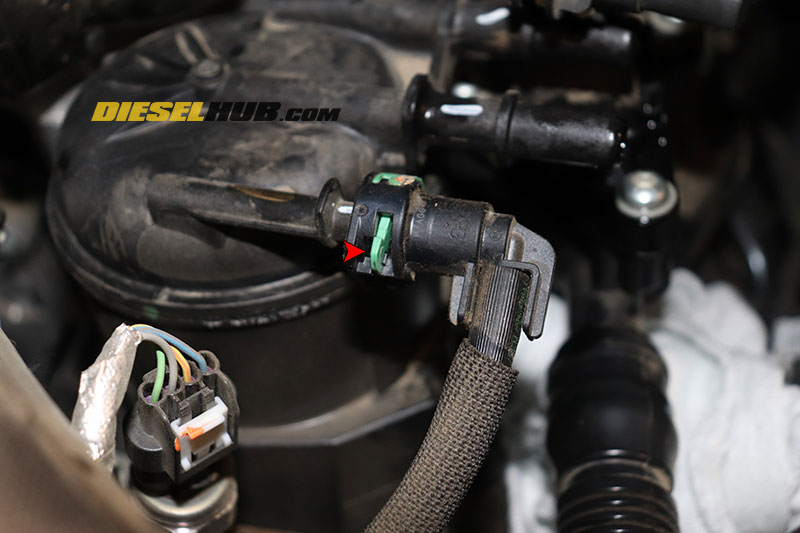
• Remove the fuel inlet hose fitting (closest to firewall) by pushing the two prongs on the white/gray clip towards the firewall until it releases (picture at left identifies a clip that has been properly released).
• Once the clip has been released, pull the hose fitting away from the fuel filter canister and position it out of the way. Catch fuel with a rag as necessary, but do not stuff anything into the fitting as fuel system contamination is likely.

• Remove the fuel outlet hose fitting (center) by squeezing the two outer prongs towards the middle of the hose and pushing the fitting into the fuel filter canister nipple while pulling the clip upwards. When the clip is released, pull the hose fitting away from the cannister and position it out of the way. Once again, fuel can be caught with a rag as necessary but do not attempt to stuff anything into the fitting.
• Remove the fuel return hose fitting (front-most) by pushing the two green prongs towards the driver side fender, then sliding them up through the fitting.
• When the green clip has been released properly, pull the return line fitting away from the fuel filter cannister to remove it.

• Once all three fuel hoses have been disconnected, rotate the fuel filter canister counter-clockwise until it releases, then pull upwards to remove from the base.
• Install the new fuel filter canister in reverse order. Note that it will slide into the base at the same angle that the old was removed; once it falls into the base, rotate clockwise until it is secured.
• Once again turn the key to the "RUN" position (DO NOT START!) to allow the fuel lift pump to begin pumping fuel through the system. After 10 seconds, turn the key to the "OFF" position. Repeat this step 10 to 12 times while checking for fuel leaks, then start the engine. If the engine runs rough, indicating air in the fuel lines, pre-cycle the key additional times following future service; the presence of air in the fuel lines can be damaging to the injection pump.

• As previously mentioned, draining the fuel-water-separator into a clear, clean container for inspection is ideal. Cloudy or milky diesel fuel is indicative of contamination or extremely poor fuel quality.

