Applicable Models:
1994.5 - 1997 Ford F-250, F-350, F-Super Duty
1999 - 2003 Ford F-250, F-350, F-450, F-550 Super Duty
2000 - 2003 Ford Excursion
2000 - 2003 Ford F-650, F-750
1995 - 1999 Ford Econoline E-350
2000 - 2003 Econoline E-350, E-450, E-550
Applicable Engine(s):
7.3L Power Stroke V-8 (7.3L DIT)
Recommend CCV Service Intervals:
Remove & clean CCV doghouse every 15,000 to 20,000 miles and reinstall with new o-rings
7.3 Power Stroke Crankcase Ventilation (CCV) System
Like most engines, the 7.3L Power Stroke diesel features a crankcase ventilation system designed to return gases and fumes from the crankcase to the intake air path. These fumes represent a mixture of volatile organic compounds that include engine oil, diesel fuel, and exhaust gases. While engine oil fumes are produced as the result of the oil breaking down, diesel fuel and exhaust gases enter the crankcase in small quantities due to blow-by. Directing these compounds into the intake air charge where they can be combusted is generally accepted as an environmentally friendly method of ridding them from the crankcase, as opposed to allowing them to escape into the ambient environment.
The crankcase vent assembly, typically referred to as the "doghouse", is a simple filter that sits between the crankcase and the intake air duct. The system is quite simple; crankcase fumes/gases are extracted through the CCV doghouse and into the intake air charge through a mouthpiece mounted roughly halfway between the air filter compartment and the turbocharger inlet. Positive pressure in the crankcase and the differential pressure caused by air travel in the intake duct work in conjunction to generate and regulate the flow of crankcase gases through the intake path.
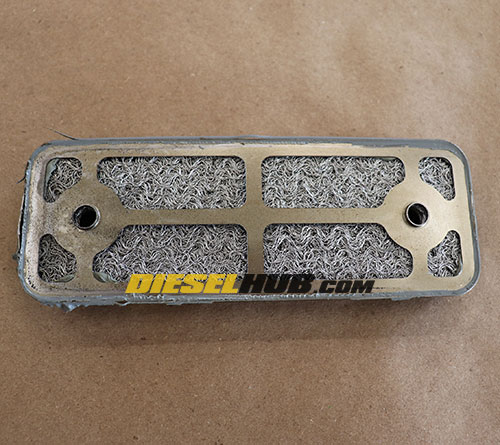
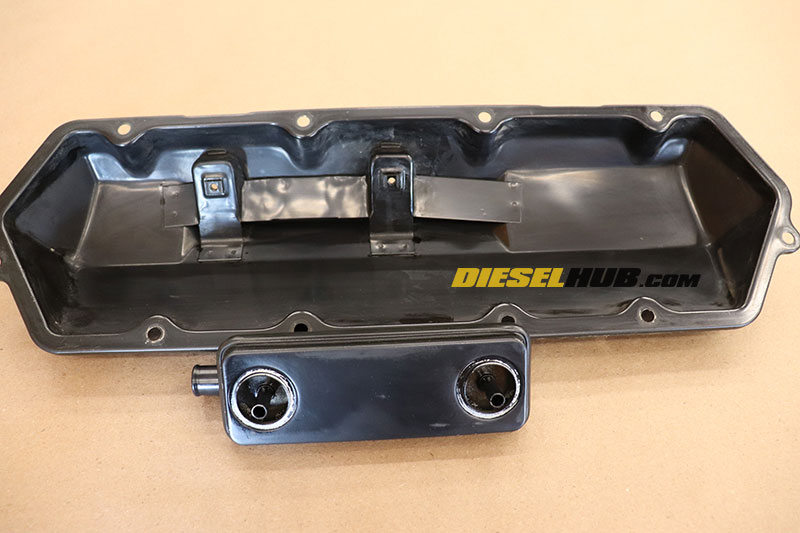
A stainless steel mesh filter inside of the doghouse helps collect and condense oil fumes so that they simply drain back into the valve cover. Consider water boiling in a covered pot. Hot water vaporizes into steam at its boiling temperature and rises to the lid. Some of the vapor condenses, collects with nearby droplets and ultimately drips back into the pot where the cycle is repeated. The same mechanisms are at play here, except that we're dealing with engine oil fumes. Some of the engine oil condenses, collects, and drains back into the valve cover while smaller, lighter particles flow through the filter and are introduced into the intake air charge. Figure 1 below provides a detailed view of the internal construction of the CCV doghouse.
The crankcase vent requires service because the oil and fumes that travel through it eventually cause sludge and grease to accumulate inside. When neglected, sludge can even begin to form on the inside of the valve cover (figure 2 below identifies a severely dirty crankcase vent). Furthermore, the o-rings that seal the doghouse against the valve cover tend to degrade due to heat and chemical exposure, causing a mild to moderate oil leak that often drips down the valve cover.
You may notice that oil tends to accumulate and settle at the intercooler boot connections; this is entirely normal and results from the oil mist being introduced into the intake air path. If there is an excessive amount of oil pooling at these locations, oil may be leaking from the turbocharger seals and this needs to be addressed. A clogged crankcase vent may result in crankcase gases pushing through the dipstick tube or the oil fill cap (if it has been removed to perform a simple blow-by test). If you notice excessive smoke coming from the crankcase, service the CCV and retest.
Another problem that is typically associated with the CCV system is excessive oil consumption. However, a clogged CCV will not cause this symptom as there will be limited flow of crankcase oil fumes if the CCV path becomes restricted. Instead, this is often caused by a dirty or clogged air filter. Airflow will always choose the path of least restriction and if the air filter is highly restrictive then a greater vacuum will be applied inside the crankcase. This can lead to significant oil consumption and it is extremely important to replace the engine air filter as necessary. Just because the filter doesn't "look" dirty does not mean it's not packed full of contaminants.
Cleaning vs Replacing the CCV Doghouse
There's no inherent reason why the CCV doghouse cannot be cleaned and reinstalled with new o-rings. Its robust construction allows for a number of cleaning techniques using light solvents and degreasers without concern. Even the rubber doghouse elbow can be reused if it is not damaged, although they do eventually deteriorate due to heat and chemical exposure. If the elbow can be cleaned and shows no signs of damage (cuts, tears, deterioration), it is entirely reasonable to reuse it.
CCV Doghouse Cleaning Techniques
The CCV doghouse is manufactured in two separate halves that are sealed with RTV sealant (the halves are NOT separable without damaging the assembly). This type of sealant is not resistant to strong solvents, so do not clean the doghouse with chemicals such as brake cleaner, acetone, paint thinner, etc. The interior and exterior of the doghouse can be cleaned with degreasing agents (canned engine degreaser, Simple Green parts cleaner, etc) and light solvents such as electrical contact cleaners (similar to brake cleaner formulations but plastic/rubber safe).
We typically soak the doghouse in diesel fuel to begin breaking up any sludge and build-up then place it in an ultra-sonic cleaner filled with a water based degreasing solution (see parts list below). After the vent appears to be clean inside-and-out, it receives a thoroughly rinse with electrical contact cleaner until the run-off is clear and the degreaser has been removed. While not everyone has access to an ultra-sonic cleaner, the same results can be achieved with any combination of the aforementioned cleaning products. All oil remnants and residues should be removed from the inside of the doghouse before reinstallation. Clean through one opening, then the other, until the run-off is clean and clear.
Associated Parts List - 7.3L Power Stroke CCV Service
| Part Description | Part Number(s) | Remarks |
| CCV o-ring set | Dieselply DP-120101 Ford F4TZ-6769-C (2 large o-rings) Ford F4TZ-6769-A (2 small o-rings) |
[1] |
| CCV o-ring set w/ mounting bolts | Dieselply DP-120101-B | [2] |
| Crankcase vent hose (elbow, connector) | Ford/international 1816030-C2 | [3] |
| Crankcase vent assembly ("doghouse") | Ford F4TZ-6A665-A | [4] |
| Electronic parts cleaner | CRC 05103 | [5] |
| Engine degreaser | CRC 05025 | |
| Part cleaner solutions | SG HD cleaner & degreaser SG industrial cleaner & degreaser SG extreme aircraft & precision cleaner |
[1] - Dieselply o-rings are sold as a kit and include (2) large o-rings to seal the doghouse to the valve cover and (2) small o-rings to seal the mounting bolts to the doghouse. Dieselply o-rings are Viton Fluoroelastomer and the small o-rings have a higher durometer (harder) to reduce deformation during installation.
[2] -
Includes all o-rings and (2) new mounting bolts. Replacement mounting bolts feature internal hex (Allen) heads in place of the factory Phillips heads, which are less likely to strip and are easily removed without pulling the valve cover.
[3] - Elbow can be reused if not cracked, damaged, or otherwise compromised.
[4] - Crankcase vent can be cleaned and reused if not damaged.
[5] - There are many alternative products available; these are routinely used in the Diesel Hub shop.
We do not recommend using brake cleaner or carb and choke cleaner as these harsh solvents may compromise the RTV seal inside the doghouse.
Removing the Valve Cover to Service the CCV Doghouse
The valve cover does not need to removed in order to access or service the CCV doghouse on the driver side valve cover. However, removing the valve cover may be necessary if the CCV has not been serviced regularly or, for whatever reason, there is an excess amount of sludge buildup in, on, or around the baffle inside of the valve cover. After removing the doghouse from the valve cover, inspect the two holes in the top of the valve cover where crankcase gases are expelled through. If there is sludge or thick oil residue inside of the valve cover, we highly recommend the valve cover is removed and thoroughly cleaned. Figure 2 below shows a prime example of a valve cover that requires cleaning.
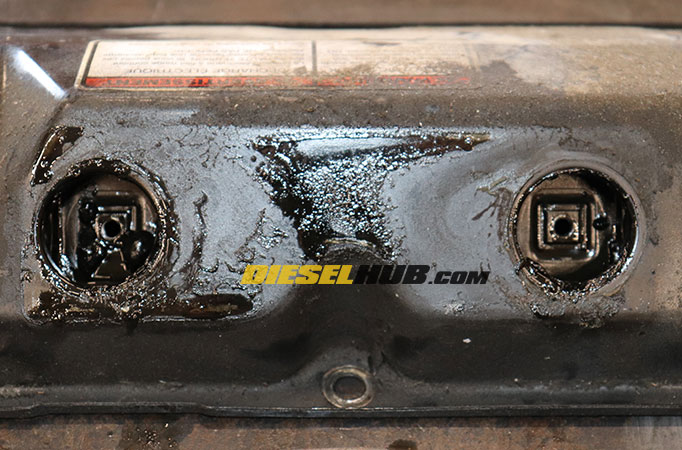
The cause of such buildup is years of oil accumulating inside of the CCV assembly and poor attention to vehicle service. Since this oil is not changed it eventually oxidizes into a thick sludge (note - this is what your engine oil would look like if it was not changed regularly). Preventing such buildup in and around the valve cover is as simple as using a high quality engine oil (see 7.3 Power Stroke engine oil guide for recommendations) and servicing the CCV system regularly (recommend every 15,000 to 20,000 miles or 2 years).
There is no need to remove the valve cover if there is no sludge build up. The valve cover has been removed in the procedures below, however the entire removal and installation process is easily performed from under the hood with the valve cover secured to the cylinder head. For information and procedures on removing the valve covers, see: 7.3 Power Stroke valve cover removal.
How to Service the CCV Doghouse on a 7.3 Power Stroke
Click any thumbnail to view fullsize, detailed image

• Disconnect both negative battery cables.
• Remove the section of intake tubing connecting the air filter compartment to the crankcase ventilation adapter mouthpiece.
• Remove the crankcase ventilation adapter mouthpiece from the turbocharger intake tube; (2) bolts with 8 mm heads secure the adapter to a metal bracket mounted to the valve cover.

• Clean the area around the CCV doghouse assembly to prevent debris from falling into the valve cover opening when it is removed.
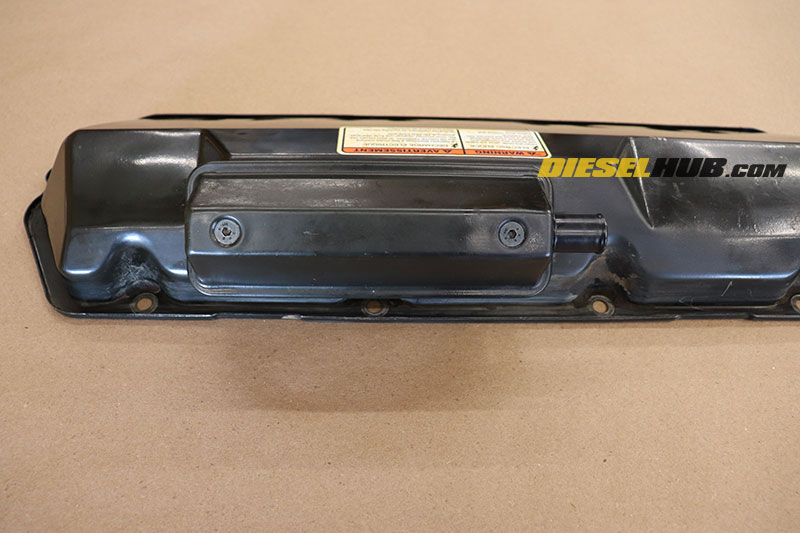
• Clean the top of the CCV doghouse so that the (2) phillips head bolts are exposed and accessible.
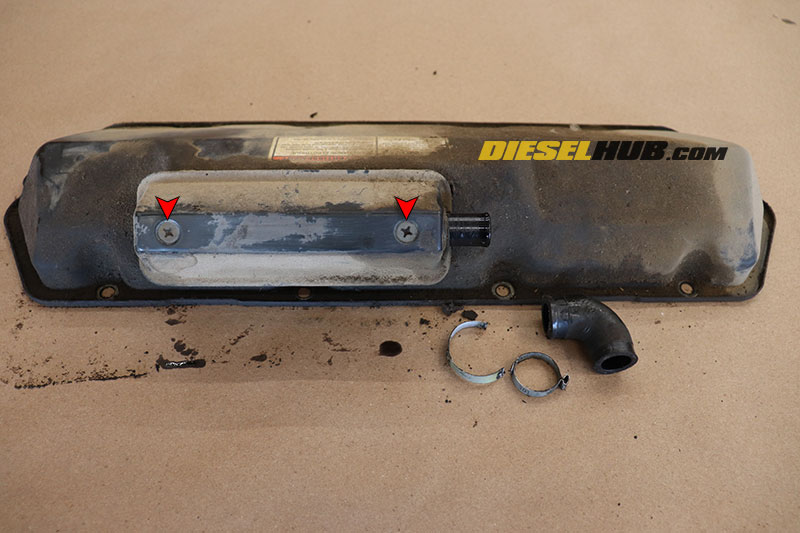
• Remove the elbow (hose) from the CCV assembly; the OEM metal bands can be cut and replaced with standard worm drive hose clamps.
• Remove the (2) phillips headed bolts securing the doghouse to the valve cover, then remove the doghouse from the valve cover (pry gently as required).
Note - always remove the elbow before cleaning the inside of the CCV assembly; chemical exposure may damage the elbow.
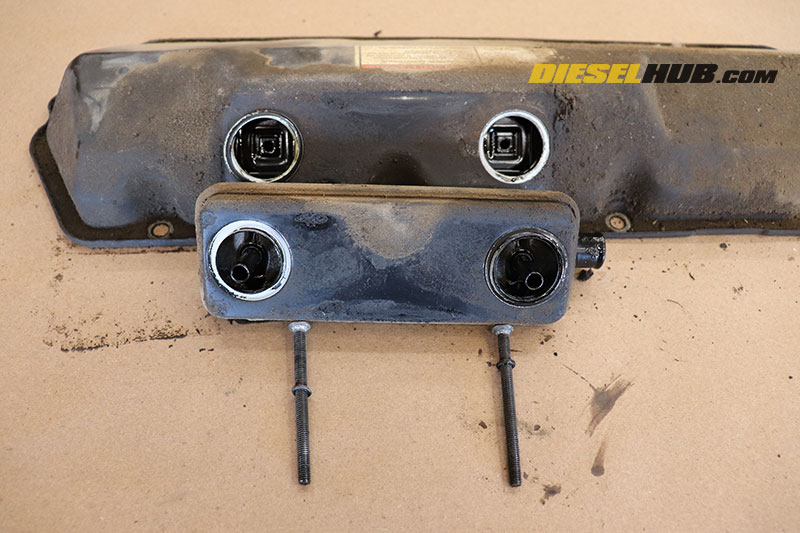
• Remove the old o-rings from the CCV assembly/valve cover and the (2) bolts.
• Thoroughly clean the exterior and interior of the CCV vent assembly (see CCV cleaning techniques in section above).

• Thoroughly clean the area around the CCV holes through the valve cover without allowing debris to enter. A clean shop towel sprayed with brake cleaner or another solvent works well in removing oil, grease, dirt, grime, and o-ring remnants.
• If the valve cover has been removed, thoroughly clean the inside of the valve cover and remove any sludge in and around the baffle.
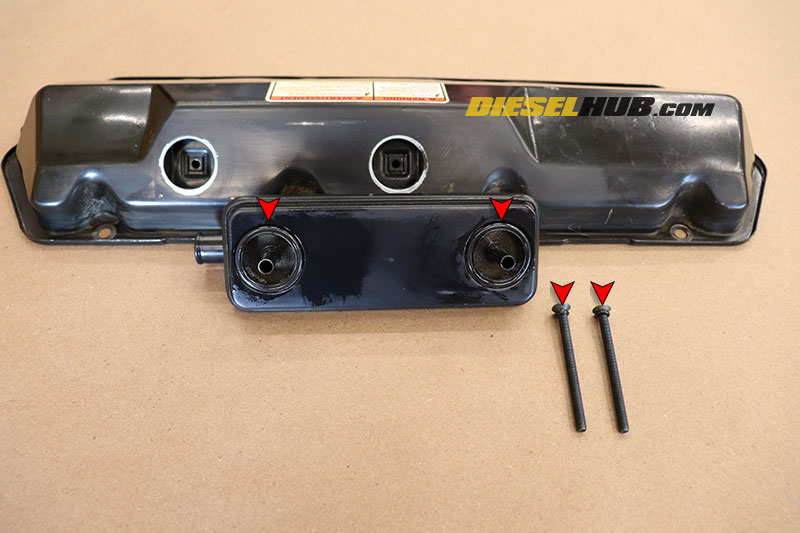
• Reinstalling the doghouse requires a total of (4) o-rings. (2) large o-rings seal the doghouse against the valve cover while (2) small o-rings secure the heads of the retaining bolts to the countersunk mounting holes at the top of the doghouse.
• Lightly coat all (4) new o-rings in clean motor oil.
• Install the (2) large o-rings into the crankcase vent.
• Install the (2) small o-rings onto the retaining bolts, sliding them up to the head.
• Reinstall the crankcase vent assembly onto the valve cover and snug the bolts in an alternating pattern until the o-rings are fully seated; do not overtighten.
• If removed, reinstall the valve cover.
• Reinstall the CCV adapter mouthpiece and all intake tubing.

