Applicable Models:
1989 - 1998 Dodge Ram 2500, Ram 3500
Applicable Engine(s):
5.9L Cummins 6BT (12v)
Engine Coolant Spec:
50/50 mix of ethylene glycol based engine coolant & distilled water
Engine Cooling System Capacity:
~ 6 gallons with standard equipment
The 5.9L 12v Cummins (6BT) requires cooling system service initially at 52,500 miles (or 36 months) followed by subsequent service at 24,000 mile (or 24 month) intervals. By switching to an extended life coolant (ELC), these intervals can be safely extended to some degree. A flushing compound such as Fleetguard Restore should be used if the required service was missed or if the engine coolant type is being changed. These solutions will remove residual elements of the previous engine coolant as well as attack a number of contaminants such as silicate sludge. Most Dodge pickups equipped with the 12v Cummins have a cooling system of capacity of 6 gallons; we highly recommend verifying your actual cooling system capacity in the owners manual before servicing your truck.
Unless you have access to the appropriate equipment required to "power-flush" a cooling system, the process requires draining the radiator, refilling the cooling system with water, driving the vehicle, and repeating until the engine coolant has been completely flushed. Once it is filled entirely with clean distilled water, it is drained once more, the hoses and various components are replaced, and the cooling system is filled with the appropriate amount of engine coolant concentrate (anti-freeze).
Coolant Selection for 12v Cummins
The Cummins 6BT requires a 50/50 mix of ethylene glycol based anti-freeze and water. We highly recommend a Fleetguard ELC (extended life coolant) for all Cummins diesels. Fleetguard is Cummins' service brand and their ELC far exceeds the service life of Chrysler's standard engine coolant. Additionally, the Fleetguard coolant is specifically formulated for diesel applications and is far superior in preventing pitting and cylinder wall erosion do to cavitation. If using Chrysler anti-freeze (packaged under the MOPAR brand) or any common off-the-shelf brand, a SCA/DCA (supplemental coolant additive/diesel coolant additive) may be required to reach a similar degree of protection.
Fleetguard also carries a line of cooling system flush solutions that are suitable for all Cummins engines. Fleetguard Restore is a solution formulated to remove oil, silicate gel (sludge), grease, and traces of fuel in the cooling system. Fleetguard Restore Plus is mildly acidic and is designed to remove rust, scale, deposits, and solder bloom. Restore Plus is recommended if there is a significant amount of rust and/or corrosion detected in the cooling system (typical in engines that have been stored for long periods of time and/or that have been running with a low coolant concentration). Fleetguard Restore is recommended under normal conditions. The use of a coolant flush solution is not necessarily required to perform a standard coolant flush, however it is required if you are changing coolant types.
It is largely preferred that the cooling system be filled with distilled water, not tap or "hard" water. Distilled water contains no minerals and is entirely neutral in the cooling system, while tap water may contain minerals and chemicals that can have a negative effect on coolant life, promote scale buildup, etc. It is preferred that cooling system flushes be performed using distilled water, however tap water can be used if the final steps of the flush are done with distilled water (as outlined in the procedures below).
Cooling System Parts
| Description | Model Year(s) | Part Number(s) | Remarks/Notes |
| Thermostat | 1989 - 1993 | Stant 14058 | [1] |
| 1994 - 1998 | Stant 14248 | ||
| Thermostat housing gasket | 1989 - 1993 | Gates 33668 | [2] |
| Inner Thermostat housing gasket | 1994 - 1998 | Cummins 3927305 | |
| Outer thermostat housing gasket | 1994 - 1998 | Cummins 3925466 | |
| Radiator cap | 1989 - 1998 | Stant 10231 | --- |
| Overflow/recover tank cap | 1989 - 1998 | MOPAR 52079331 | --- |
| Overflow/recovery tank | 1989 - 1993 | MOPAR 52027784 | [3] |
| 1994 - 1998 | MOPAR 52027778 | ||
| Upper radiator hose | 1989 - 1991 | Gates 20957 | --- |
| 1991.5 - 1993 | Gates 21930 | ||
| 1994 - 1998 | Gates 22081 | ||
| Lower radiator hose | 1989 - 1993 | Gates 20431 | |
| 1994 - 1998 | Gates 22082 | ||
| Fleetguard Restore | N/A | Fleetguard CC2610 | [4] |
| Fleetguard Restore Plus | N/A | Fleetguard CC2638 | [5] |
| Fleetguard ES COMPLEAT ELC | N/A | Fleetguard CC2820 | [6] |
| Fleetguard ES COMPLEAT OAT ELC | N/A | Fleetguard CC36073 | [7] |
| Fleetguard SCA/DCA | N/A | Fleetguard DCA4 | [8] |
| SCA/DCA test strips | N/A | Fleetguard CC2602A | [9] |
[1] 180° F degree thermostat, OEM temperature
[2] 1989 to 1993 model year thermostat housings use a single seal, 1994 - 1998 use an inner and outer seal.
[3] Overflow tank tends to collect sludge and become brittle; replace as necessary. Tank can be cleaned with hot water and baking soda followed by rinsing thoroughly with dish soap. Recommend replacement if coated with thick sludge, algae, etc to avoid possible contamination.
[4] General purpose cooling system flush solution; removes traces of fuel, engine oil, sludge (silicate gel), and old engine coolant.
[5] Contains a mild acid; do not allow solution to sit in cooling system for more than 90 minutes. Removes rust, scale, buildup, and solder bloom.
[6] Low silicate concentrate with 150,000 mile service life. Blue in color, no SCA/DCA required at initial fill.
[7] Organic silicate-free concentrate with 300,000 mile service life. Red in color, no SCA/DCA required at initial fill.
[8] If not using a Fleetguard extended life coolant (ELC), an SCA/DCA additive may be required.
[9] Used to test and adjust SCA/DCA level. Test strips have a finite shelf life; discard stored test strips after a few months.
5.9L Cummins 12v Cooling System Service Procedures
Note - The following procedures are based on a 1996 model year engine, but the procedures themselves are applicable to all 5.9L 6BT Cummins engines; some components may appear differently on 1st Gen trucks.
A coolant concentrate must be used for these procedures to work and a 50/50 anti-freeze to water ratio to be obtained. Do not use a pre-diluted engine coolant.
Warning - these procedures require working on a hot engine. Engine coolant temperatures can theoretically reach 200° F and beyond. Take any and all appropriate safety precautions when working around a hot cooling system. If you are not comfortable working under such conditions, do not attempt these procedures or allow the engine to cool completely between steps.
Click any thumbnail to view fullsize, detailed image
• Locate the drain valve/petcock on the driver side, bottom corner of the radiator. Attach a 6" to 12" section of 5/16" hose to the petcock to prevent engine coolant from spilling while draining (if applicable, some petcocks drain through the valve stem).
• Place a suitable drain pan with a minimum 4 gallon capacity below the radiator drain valve.
• Open the drain valve and allow the radiator to drain completely. Remove the radiator cap so that it may vent, speeding up the process.
• Once the radiator has drained completely, close the drain valve.
• Fill the radiator with clean water (tap or distilled) and reinstall the radiator cap. Start the engine and bring it to operating temperature (typically requires driving for several miles, diesel engines tend to run cool at idle w/ no load) with the heater set on maximum heat to ensure that the heater core is flushed.
• After 5 to 10 minutes of running at operating temperature, turn the engine off and drain the radiator once more. Repeat until minimal coolant is left in the system (3 to 5 times, water should begin to drain mostly clear).
• When the radiator begins to drain clear (water only, minimal to no anti-freeze), add a flushing solution per the manufacturer's directions (1 gallon of Restore/Restore Plus to every 10 gallons of cooling system capacity) then fill the remainder of the radiator with clean water (tap or distilled).
• Once again bring the engine to operating temperature and drive/run per the manufacturer's recommendations (60 to 90 minutes at operating temperature for Fleetguard Restore and Restore Plus).
• Drain the radiator completely, refill with clean water (tap or distilled), and allow engine to run 5 to 10 minutes at operating temperature. Repeat flush process until radiator drains clear and not cloudy, i.e. no to minimal signs of coolant flush solution.
• Perform an addition 2 to 3 flush cycles using distilled water. On the last drain, do not refill the radiator and complete the steps below.
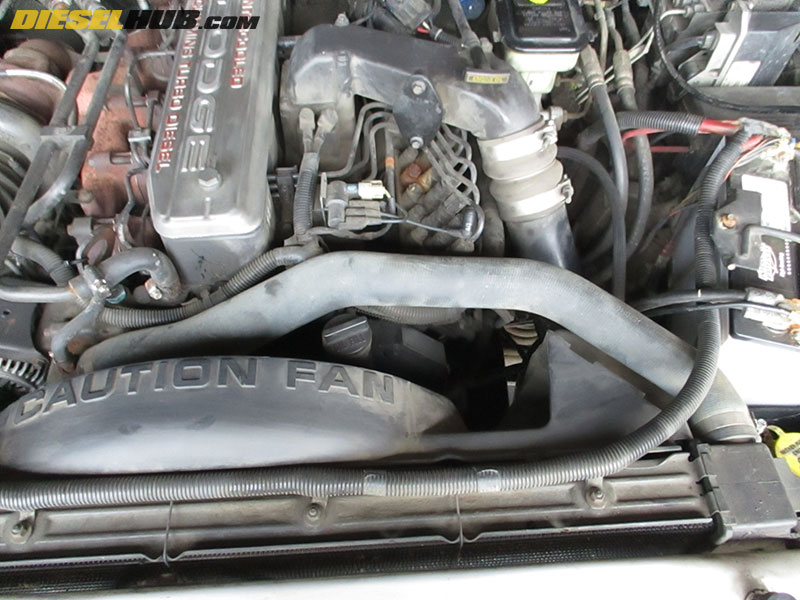
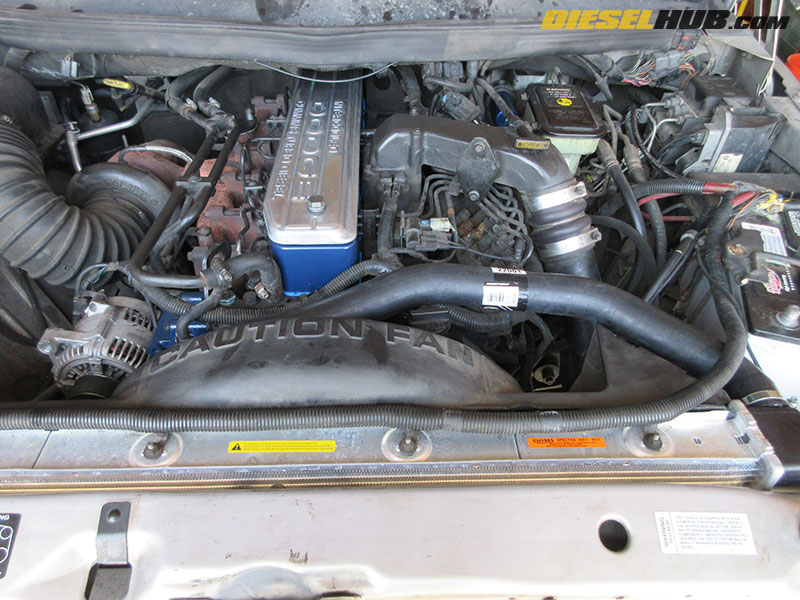
• Remove the upper radiator hose (connects driver side of radiator to engine thermostat housing).
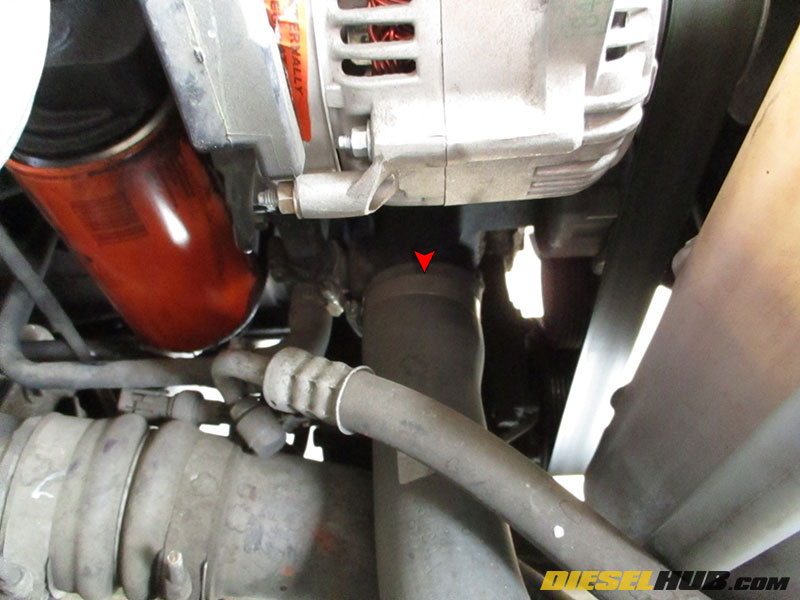
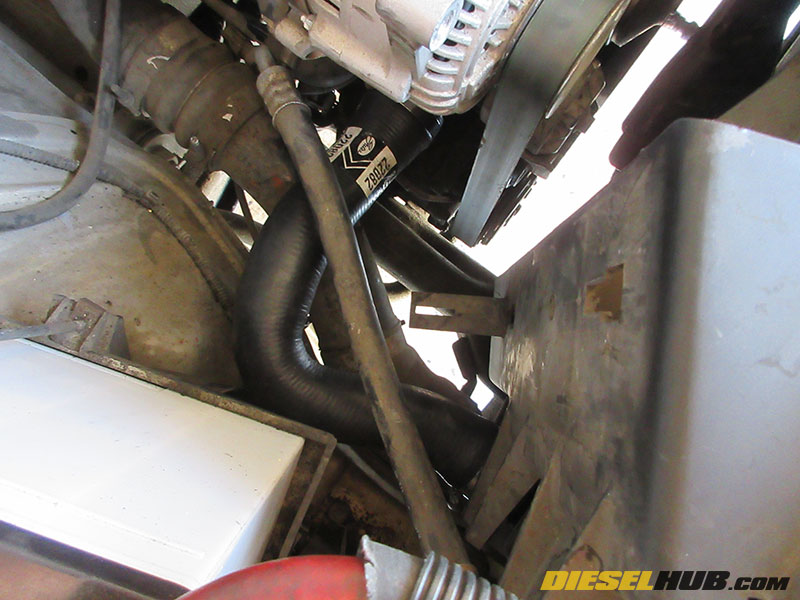
• Remove the lower radiator hose (connects passenger side of radiator to engine block below the alternator). Note that a significant amount of water is going to drain from the engine block once the lower hose is removed; position a drain pan below the lower hose before removal.
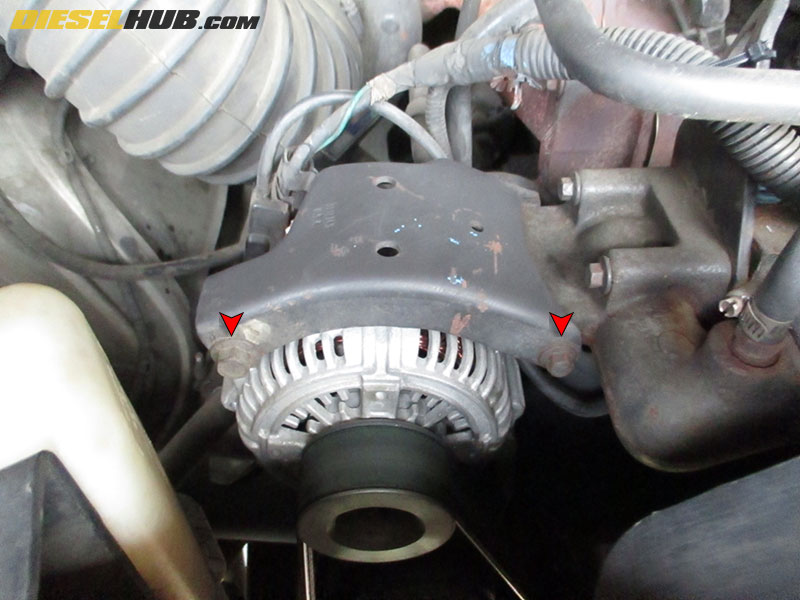
• Remove the support bracket located on the top of the alternator using a 10 mm socket for the small bolt and a 13 mm socket for the larger bolt. The alternator does not need to be removed.

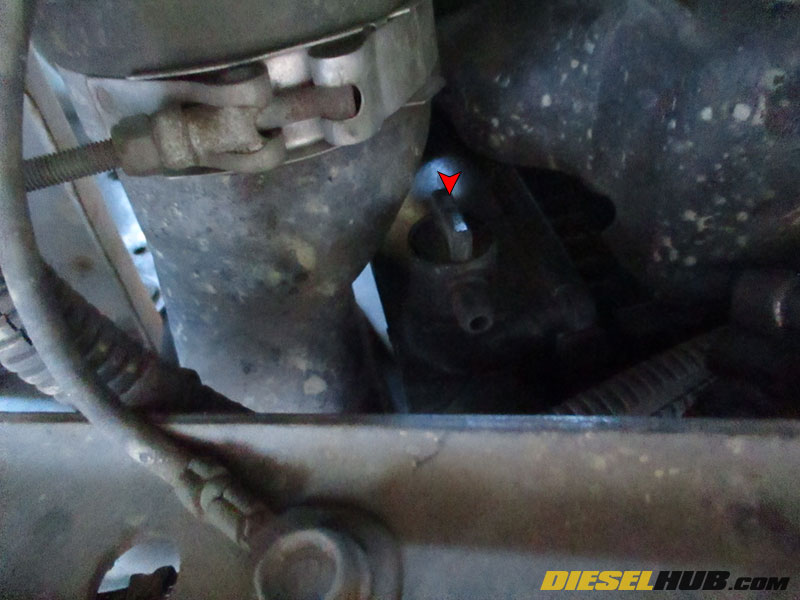
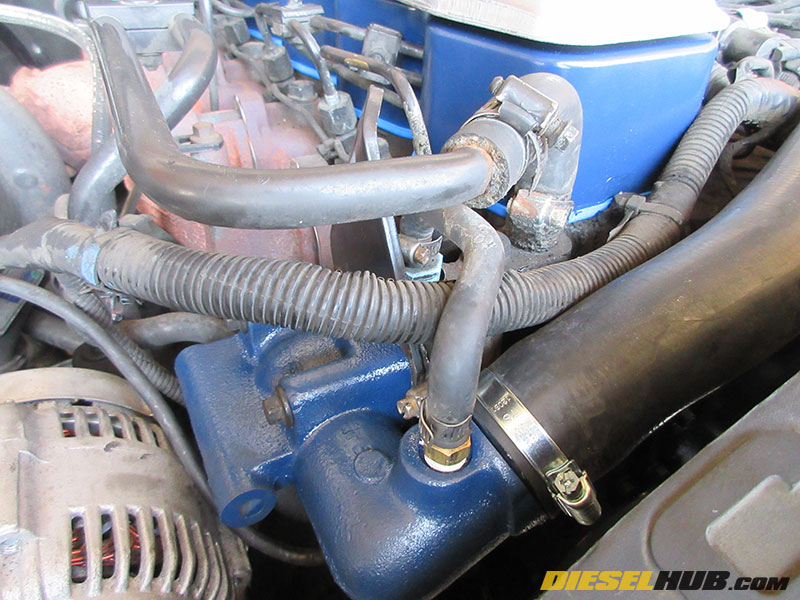
• Remove the thermostat housing at the front, passenger side of the engine block using a 10 mm socket. There are a total of (3) bolts; (2) at the top of the housing and (1) at the bottom of the housing (hidden in image do to alternator).
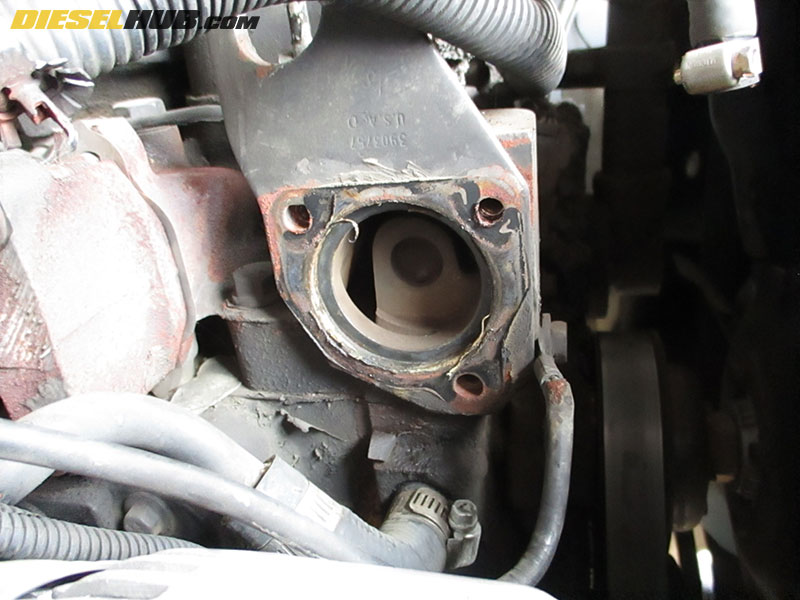
• Remove the engine lift eye, then throughly clean the thermostat housing and lift eye mounting surfaces, removing all traces of gasket material and RTV silicon.
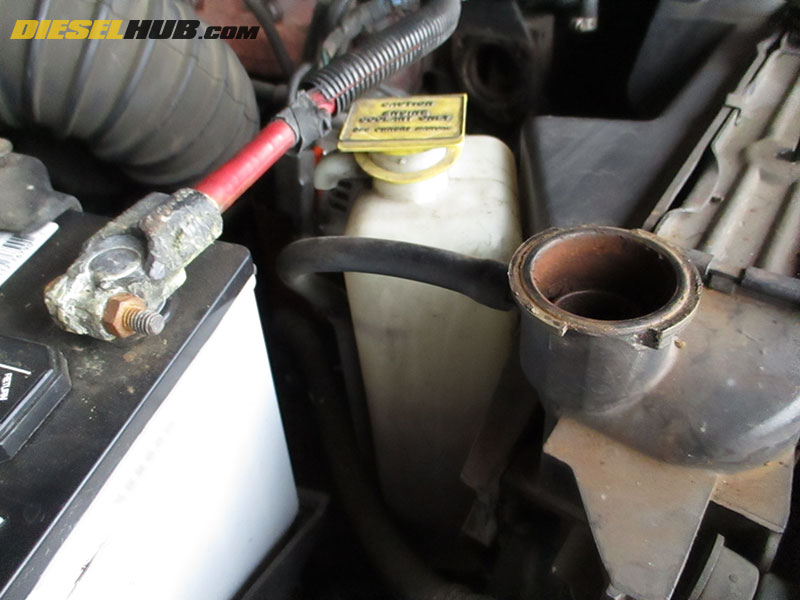
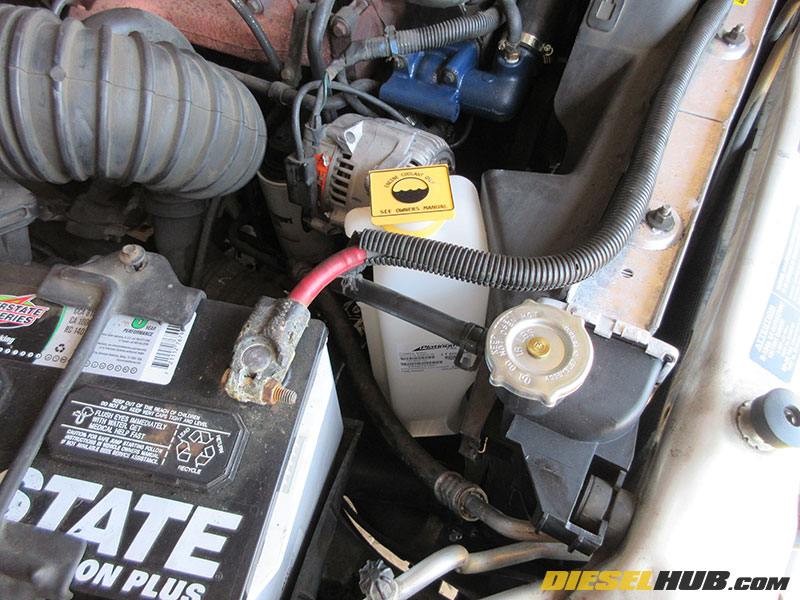
• Remove the overflow tank from the passenger side of the fan shroud. It is held in place by two small slots and a hemispherical (ball) clip. Push the "ball" clip inwards to release, then simply pull upwards (some force/maneuvering required). There is a small heater hose connecting the radiator to the overflow tank must be removed first.
• If the tank is to be reused, clean thoroughly with warm water and dish soap (or another suitable detergent).
• Thoroughly clean the thermostat housing, removing all remnants of gasket material, RTV silicon, buildup, and/or debris.
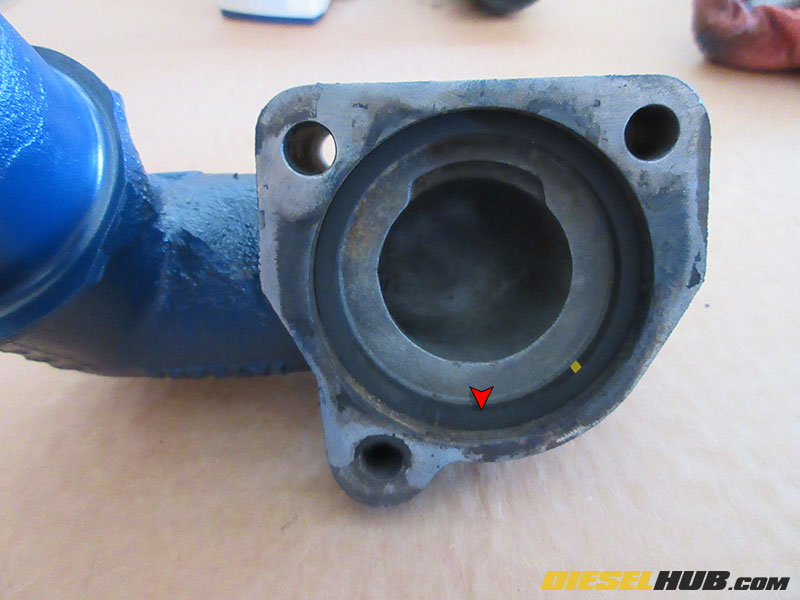
• Install the inner thermostat gasket (rectangular o-ring) so that it fully seats into the thermostat housing.

• Install the thermostat in the correct orientation (use picture at left as reference).
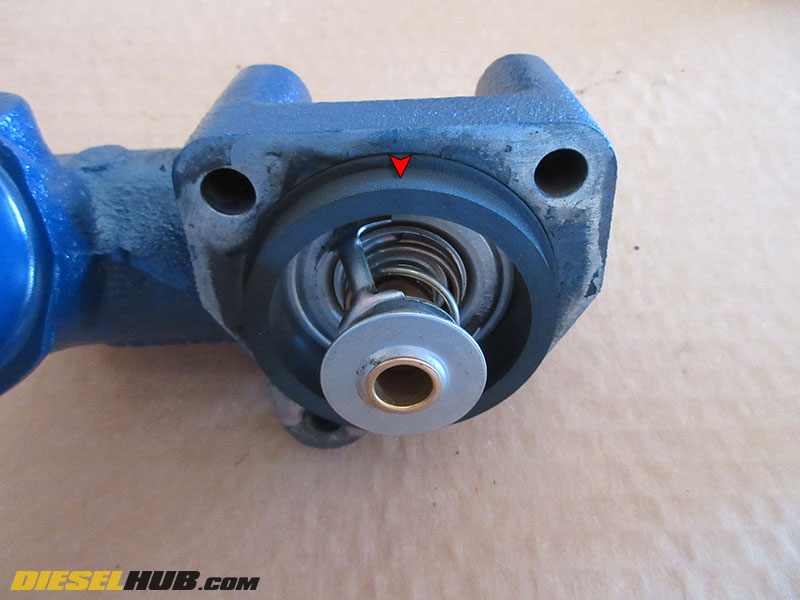
• Install the outer thermostat gasket so that it seats against the thermostat. The gasket only fits snug in one orientation; the wider portion of the gasket inserts into the thermostat housing.
• Place a small bead (~3/16 in) of RTV silicon (recommend Permatex Ultra Black) around both sides of the lift eye.
• Reinstall the lift eye and thermostat housing. Reinstall the thermostat bypass hose to the nipple on the thermostat housing. Allow the thermostat housing silicon to cure per the manufacturer's instructions (typically 24 hours) before continuing.
• Reinstall the upper alternator bracket previously removed.
• Install the lower radiator hose (passenger side of engine block to passenger side of radiator) with new hose clamps.
• Install the upper radiator hose (driver side of radiator to thermostat housing) with new hose clamps.
• Reinstall the overflow tank and secure the hose connecting the tank to the radiator.
• Install a new radiator cap.
• Verify the cooling system capacity by referring to your truck's owners manual. This 1996 Ram 2500 has a cooling system capacity of 6 gallons (common for 12v Cummins engines).
• Divide your total cooling system capacity by 2; this is the amount of coolant concentrate (anti-freeze) that you must add to the radiator. In this instance, we're going to add 3 gallons of coolant concentrate. Fill the radiator with the appropriate amount.
• Once the engine coolant has been added to the radiator, fill the radiator with distilled water until it is completely full (a perfect 50/50 mixture is therefore obtained).
• Fill the overflow tank with distilled water until it reaches the appropriate level indicator.
• Start the engine and check for leaks. Bring the engine to operating temperature and verify that the thermostat is functioning correctly (engine does not overheat).
