
Applicable Models:
2003 - 2010 Ford F-250, F-350, F-450, F-550 Super Duty
2003 - 2005 Ford Excursion
2004 - 2010 Ford E-Series
Applicable Transmission:
Ford 5R110W TorqShift
The 5R110W TorqShift five speed automatic transmission represents a fully electronic evolution of the previous Ford 4R100 four speed transmission. Most versions of this transmission require service at 30,000 mile intervals, but Ford increased this to 60,000 miles for 2009 and 2010 model year vehicles. Routine service prolongs component life and conserves shift quality. Servicing a transmission is never a cure-all for poor shift quality and will not eliminate mechanical or electrical faults within the transmission.
The 5R110W is equipped with both a sump and remote filter. The remote or auxiliary filter element is contained in a separate housing mounted to the passenger side frame rail near the radiator at the front of the vehicle. It prevents fine particles from entering the transmission oil cooler, where they could accumulate and impede flow across the heat exchanger. Ford originally specified MERCON SP automatic transmission fluid for the 5R110W transmission, but this has since been replaced with MERCON LV. From TSB SSM 51909:
"MERCON LV has replaced all versions of MERCON SP and can be used going forward. Mixing MERCON LV and MERCON SP in the same transmission is acceptable. After 30-Jun-2023, MERCON SP ATF will no longer be manufactured and will only be available until inventory depletes." - Service Bulletin 51909
Service Options
There are several methods for servicing an automatic transmission, including the sometimes controversial power-flush procedure. For all intents and purposes, there is no need for specialized equipment in order to service an automatic transmission and maximize its longevity, even if some of the "old" ATF remains in the system. To rebut the argument that all fluid should be removed and replenished during a transmission service, I would point out that many engines retain oil during an oil change and that replenishment of the lubricant with new filters provides sufficient long-term protection.
Furthermore, Ford's 30,000 mile service intervals for the 5R110W are fairly strict in comparison to some of its more recent "filled-for-life" powertrain products. With that said, this article details a common service process that focuses on filter replacement and fluid replenishment without attempting to flush any part of the system.
Inspection
The 5R110W TorqShift transmission has one magnet on the inside of the pan (around the drain plug) and another in the auxiliary filter housing. Both magnets should be inspected and cleaned before they are removed. Figure 1 (below) depicts a transmission pan with no indication of problems despite some material clinging to the magnet.
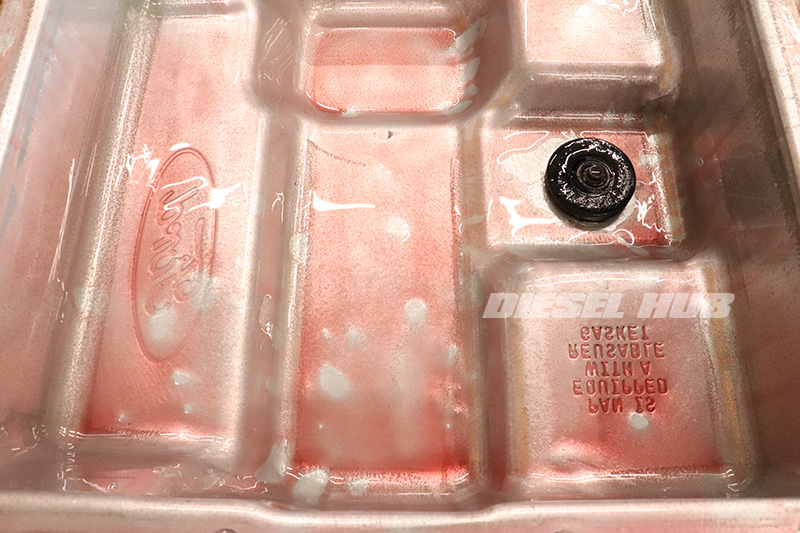
This magnet is lightly loaded with metallic material and is doing its job. Note that the transmission fluid is clean and clear with no debris floating around - this is normal. It is indicative that this transmission is being serviced properly and is highly unlikely to be experiencing any mechanical flaws. Figure 2 (below) identifies a less desirable situation.
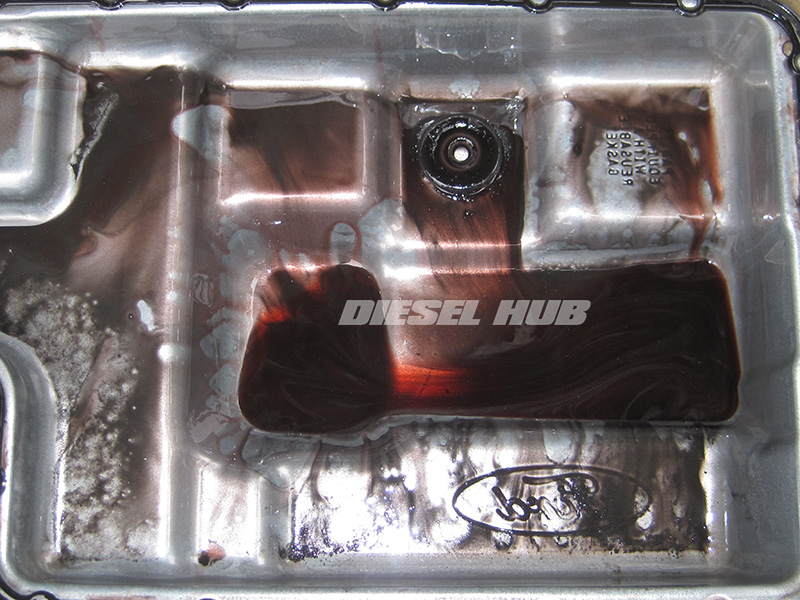
Note the color of the fluid and the particles floating around in the bottom of the pan; all that "glitter" is a bad sign. This is not only abnormal, but it indicates significant damage, wear, and/or neglect. This transmission is ready for (or very close to requiring) an overhaul. Although it still functions, its performance is going to diminish significantly when new ATF is run through the unit and dislodges all the fine particles clinging to the clutches and various passageways.
Parts List
| Description | Part Number(s) | Remarks | |
|---|---|---|---|
| Sump filter | 2003 - 2007 | Motorcraft FT-144 | [1] |
| 2008 - 2010 | Motorcraft FT-180 | ||
| Remote filter element | Motorcraft FT-145 | [2] | |
| Filter housing o-ring | Ford 3C3Z-7J126-AA | [3] | |
| Transmission pan gasket | Ford F6TZ-7A191-A | [4] | |
| Drain plug | Ford F81Z-6730-AA | [5] | |
| Transmission Fluid | Ford MERCON LV ATF | [6] | |
| Transmission pan fasteners | DP-140220 | [7] | |
[1] - The transmission pan is deeper on 2008 to 2010 versions of the filter. The FT-180 filter cannot be installed in an early style pan, and the FT-144 cannot be installed in a late style pan.
[2] - Does not include the o-ring seal for the filter housing
[3] - Seal is required when replacing the remote filter
[4] - OEM molded gasket can be reused up to several times; replace if dry, cracked, bent, damaged, etc
[5] - Drain plug is reusable for at least several times if the rubber seal is not damaged; inspect and replace as required
[6] - MERCON LV is the correct replacement for the original MERCON SP specification; MERCON SP production ceased in 2023
[7] - Sold as a complete set, replace as required (lost, damaged, etc)
Service Procedures
Begin by placing a suitable container beneath the oil pan to collect the old automatic transmission fluid as it drains. Approximately 7 to 10 quarts of fluid will drain, but it will vary case-by-case so be sure to use a container with a large enough capacity. An extra wide pan is desirable because fluid is going to continue to drip off the solenoid body once the transmission pan is removed, and even more after the filter assembly is off.
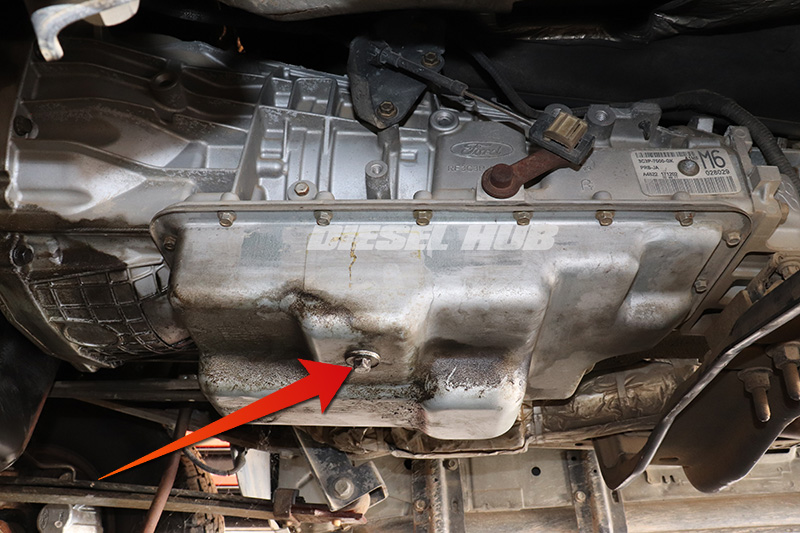
Remove the drain plug with a 13 mm socket or wrench and let the fluid begin to drain. I do not recommend servicing a transmission after it has been driven and the fluid is warm or even hot. ATF flows fairly readily and even in cooler conditions it will have no trouble draining quickly and completely. If you want to capture a sample of the ATF for inspection, collect a quart in a clear glass container immediately after the plug has been removed; the first fluid to drain will be from the bottom of the sump and near the magnet.
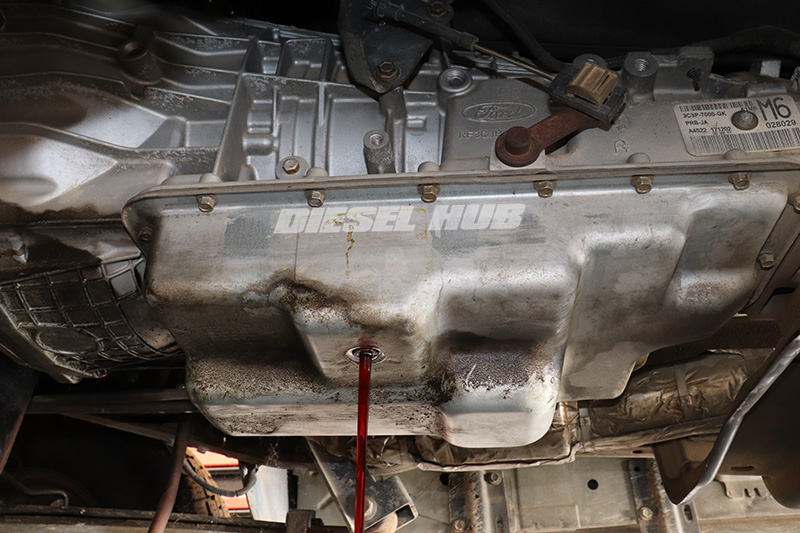
While the transmission oil pan is draining, locate the remote filter housing. It is mounted to the passenger side frame rail next to the engine in the vicinity of the radiator; look for an aluminum housing with a hex feature cast into the base. Place a suitable container beneath the housing (it can be much smaller than the one collecting fluid from the transmission pan) and loosen, then remove it with a 22 mm socket. Note that it may be tight, generally due to the o-ring seal drying and becoming stubborn.
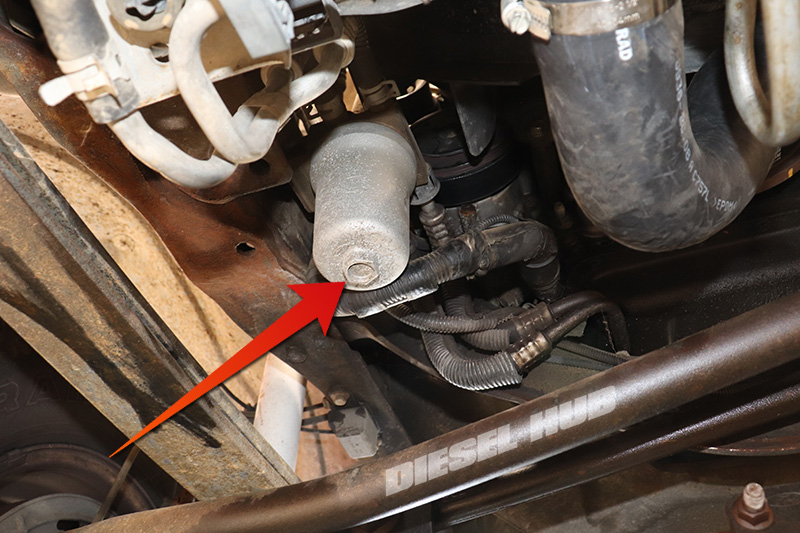
While the remote filter is draining, move back to the transmission itself. The transmission fluid pan is secured by a total of (20) flange bolts that require a 10 mm socket. Start by reinstalling the drain plug, then remove all but (4) easy to access bolts - I generally leave a bolt at or near each corner. Next, while applying pressure upwards on the pan such that it will not fall when the last bolt is removed, remove the remaining bolts. Once the pan is free, carefully guide it off of the transmission and onto the ground. If the gasket is sticking, just give it a tap to free it.
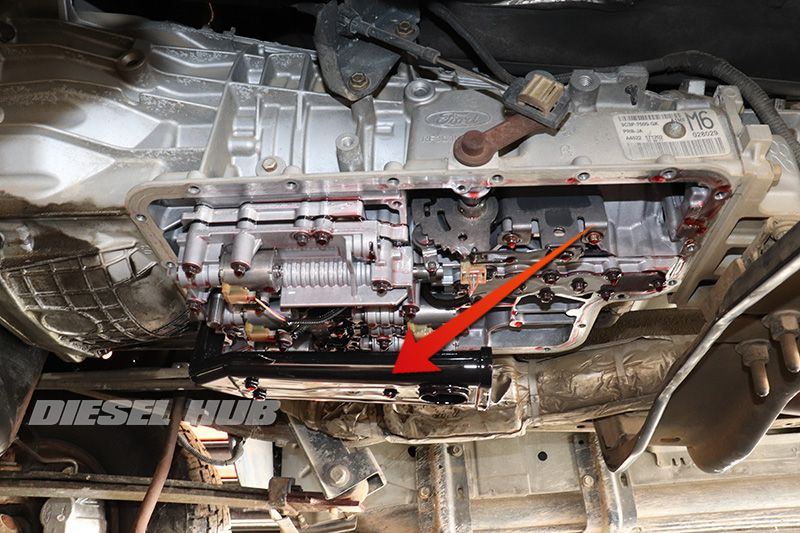
If the container that you are collecting fluid in is dimensionally smaller than the actual transmission fluid pan, place the fluid pan on the floor directly beneath the transmission. If the collection pan is larger, set it beneath the transmission. Remove the sump filter by supporting both ends and twisting it side-to-side (clockwise to counter-clockwise from the ground looking straight upwards) and gently pulling downwards until it is free from the case. Note that a large amount of fluid is going to rapidly drain when the filter is removed, so do not position yourself directly beneath the transmission.
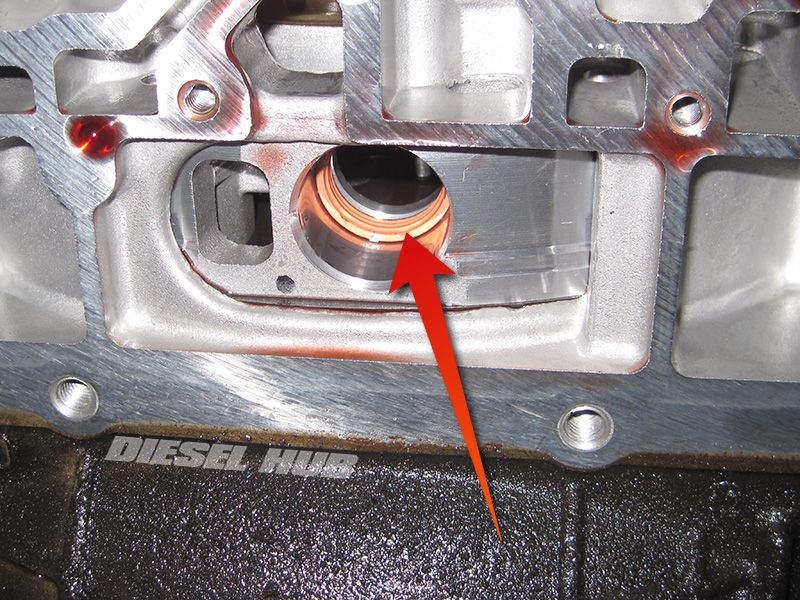
Let the transmission drain for a few minutes, then verify that the sump filter seal is not stuck in the case. Even if the filter came out with a seal attached double check that there is not an extra seal in the case, possibly from a prior service. Also verify that there are no remnants of an old seal and that the mounting surface is clean. At this stage, let the transmission continue to drain and drip fluid.
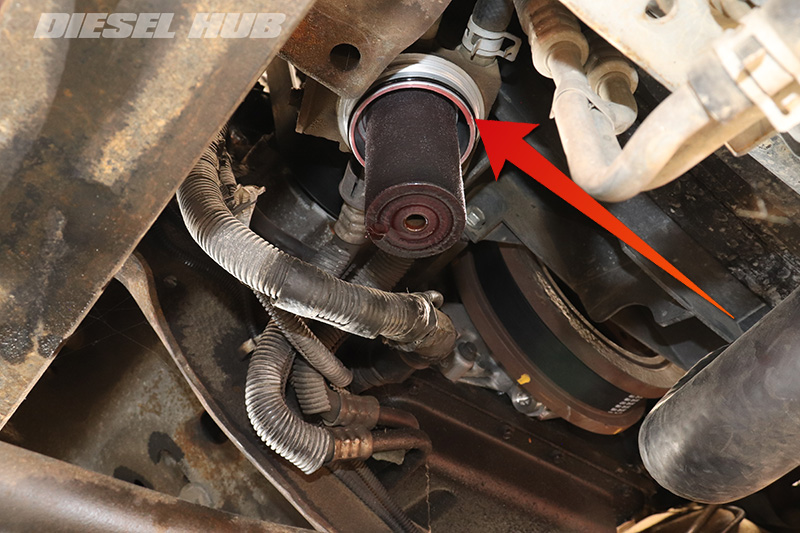
Move back to the remote filter. Remove the filter by rotating it while pulling downwards. Note that there is a magnet that rests at the base of this filter; it is not shown because it came off with the housing, but yours may be stuck to the bottom of the filter element. After the filter element has been removed, remove the o-ring at the top of the filter housing - it should not be reused.
Before you continue, thoroughly clean the transmission fluid pan. The magnet is removable and any material that has collected on it, or in the bottom of the pan, should be removed before it is reinstalled.
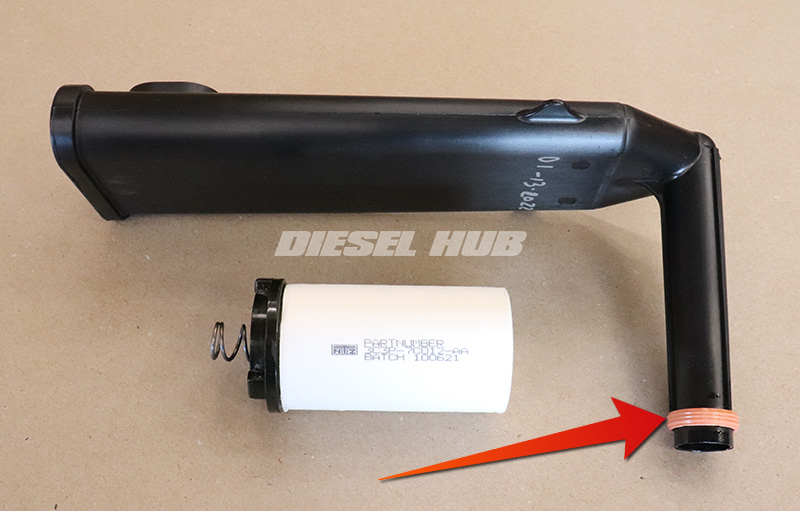
Prepare the new remote filter by installing the magnet. There's a cylindrical protrusion that must be inserted into the opening at one end of the filter but there is no "top" or "bottom" to the filter, it just needs to be inserted at one end. The large o-ring for the remote filter housing must be lubricated with clean ATF and installed onto the base of the housing. The sump filter has a pinkish-orange seal that must also be lubricated with clean ATF (red arrow, figure 9).
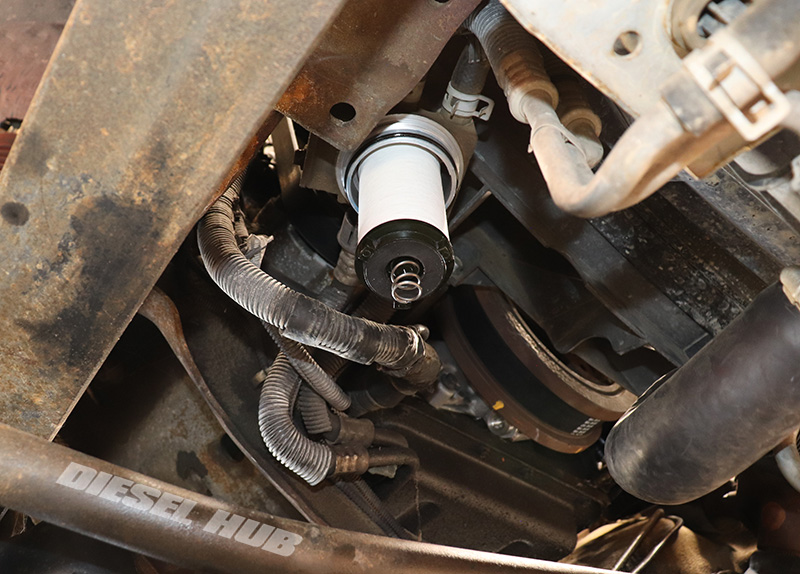
Once the remote filter housing o-ring is installed, the filter element, magnet, and spring can be installed on the filter base. Note that the filter element is not directional and cannot be installed incorrectly or "upside down". The components should stay together and in place while the housing is installed. Hand tighten the housing as much as possible, then use a socket to tighten the housing completely (until there is no gap between the housing and base).
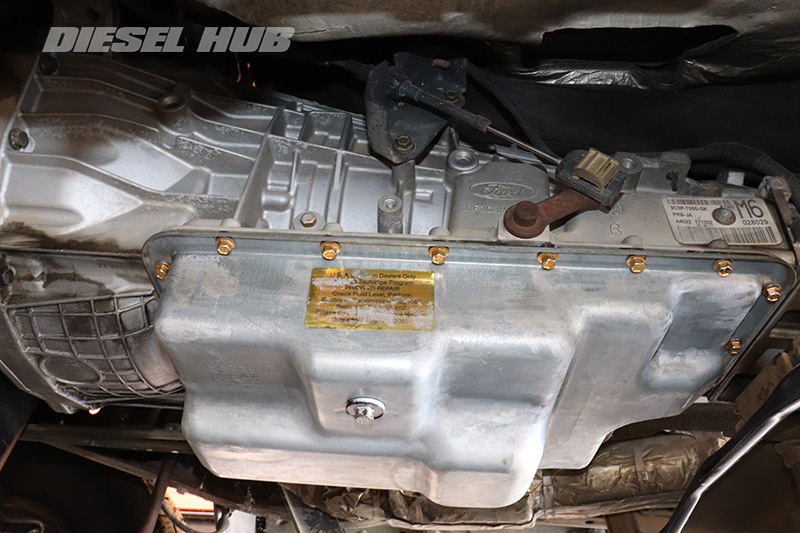
Install the new sump filter by rotating it side-to-side while pushing the neck upwards into the opening in the transmission case; it will bottom out when it's fully seated. Next, align the gasket with the transmission pan and hold it up to the transmission case. Install bolts in each corner to hold it in place, then start the remaining bolts by hand. Ensure the gasket is correctly installed, then torque each bolt to 11 ft-lbs (132 in-lbs) in an alternating fashion. Reinstall the drain plug and torque it to 13 ft-lbs (156 in-lbs).
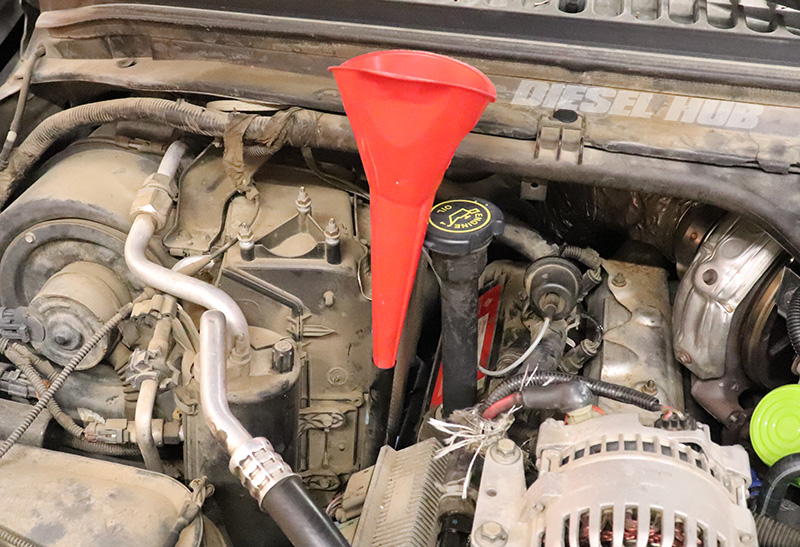
Next, remove the transmission fluid level indicator (dipstick) and fill the transmission through the tube with new MERCON LV ATF. Expect to use 7 to 10 quarts of automatic transmission fluid - after the first 5 quarts or so, start using the dipstick to check the fluid level frequently as additional ATF is added. Ideally, the fluid level should reach the middle of the crosshatched section of the indicator labeled "C" for "cold".
Once the ATF level has been replenished start the engine and move the range selector through each position (P-N-R-1-2-3), then turn the engine off and re-check the fluid level. Repeat this process once more before taking the vehicle on a short test drive. After the drive, re-check and add ATF as necessary. Finally, take the vehicle on a long drive to allow the system to reach normal operating temperature. Check the level once more after it has cooled, then top off the system as necessary.


Editor, Diesel Hub