Applicable Models:
1994.5 - 1997 Ford F-250, F-350, F-Super Duty
1999 - 2003 Ford F-250, F-350, F-450, F-550 Super Duty
2000 - 2003 Ford Excursion
1995 - 1999 Ford Econoline E-350
2000 - 2003 Ford F-650, F-750
2000 - 2003 Econoline E-350, E-450, E-550
Applicable Engine(s):
7.3 liter Power Stroke V-8 (7.3 DIT)
A crankshaft damper, harmonic balancer, or harmonic damper is a component installed onto the front of the crankshaft which counteracts torsional vibrations and the corresponding resonance created by the movements and forces produced by the rotating and reciprocating assemblies of the engine. A pulley incorporated into the front of the engine also serves as the driving force for the accessory drive system, which includes the alternator, water pump, power steering pump, and AC compressor.
The crankshaft damper is formed from two large cast iron rings separated by a rubber isolator or bushing. The inner ring is strategically machined such that the center of mass does align with the center of the crankshaft. A keyway helps align the damper to the crankshaft so that the off-centered mass appropriately counters crankshaft resonance. However, the damper is secured to the crankshaft by means of an interference fit which ensures that the two components rotate in perfect unison and there is no "rocking" of the damper position with respect to the crankshaft as the engine speeds up and slows down.
Crankshaft dampers are generally an item that is replaced as needed, though they are rarely inspected and even a "worn" damper provides a reasonable degree of resonance control. It is rare for the damper on a 7.3 Power Stroke to fail, but it is worth inspecting when chasing abnormal vibrations or engine noises. In some instances it is possible for the damper to be responsible for excessive noise coming from the transmission flexplate/flywheel.
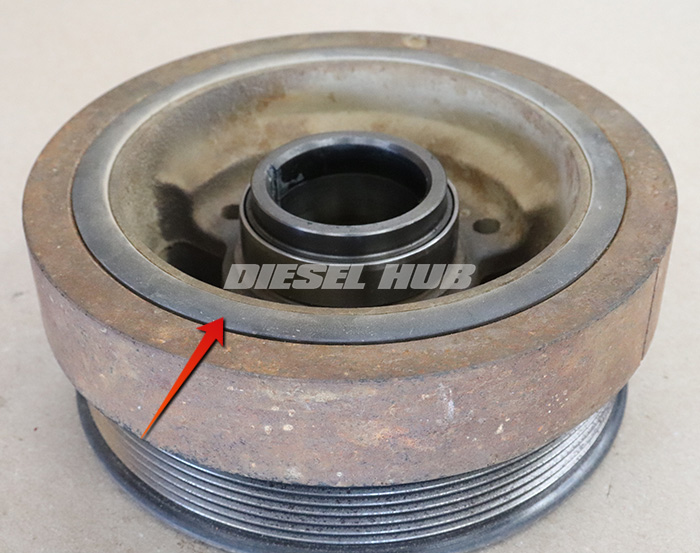
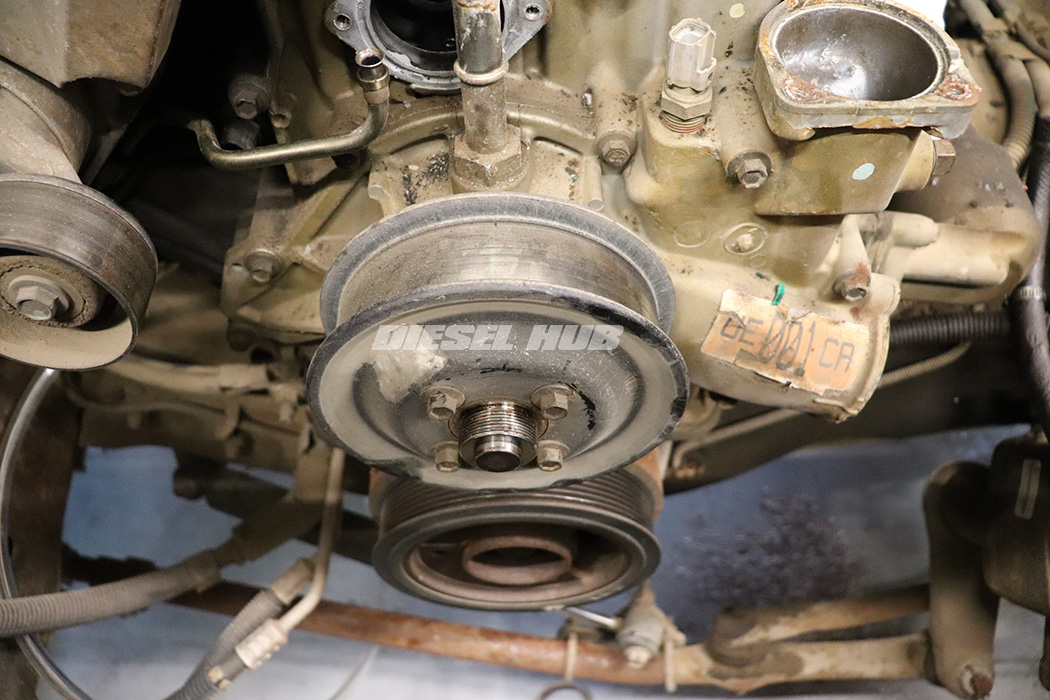
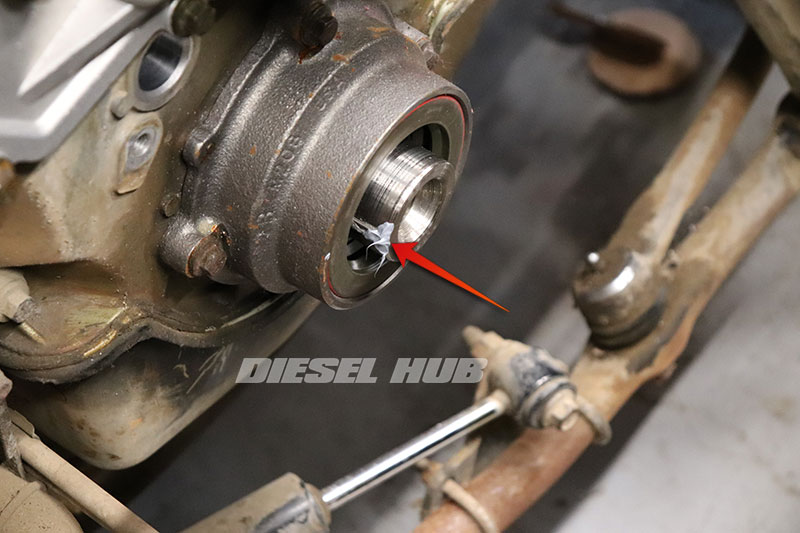
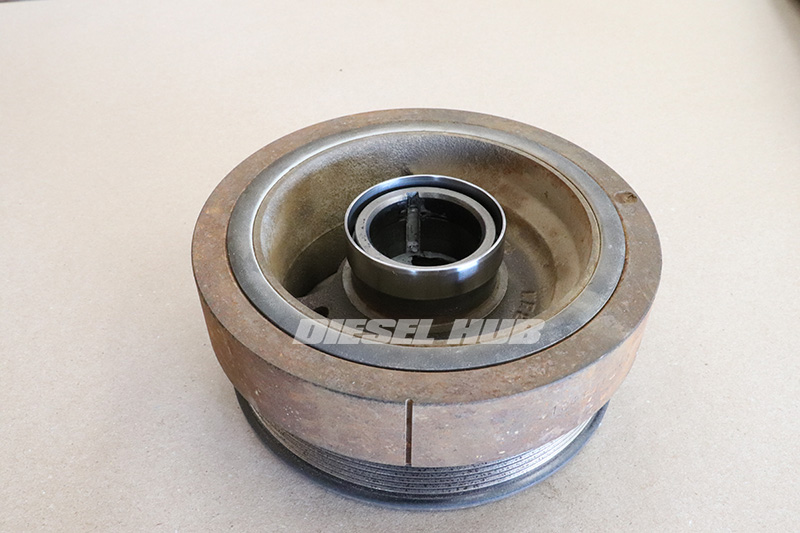
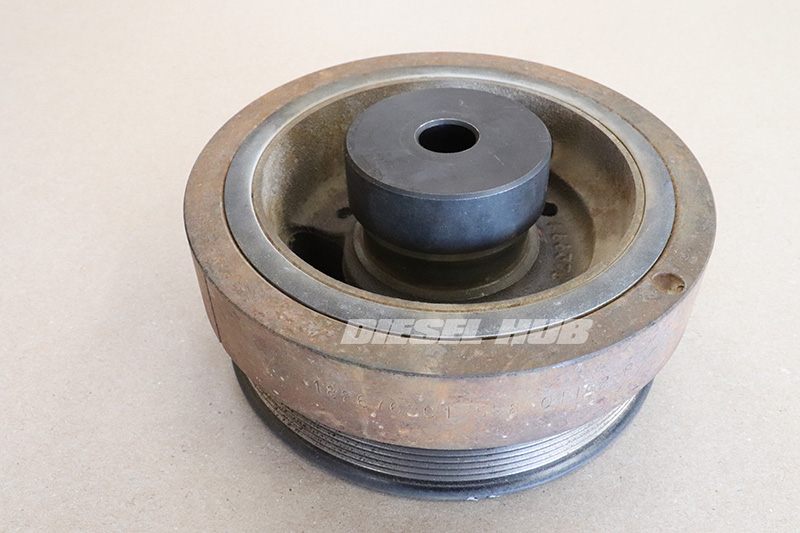
Determining the condition of the crankshaft damper on a 7.3 Power Stroke involves inspecting the rubber material that separates the inner and outer halves. When this rubber ring begins to protrude beyond the metal surfaces or shows signs of deterioration - cracking or missing material - it is time to consider replacing the part. Figure 1 below identifies the rubber component of the crankshaft damper on a 7.3 Power Stroke.
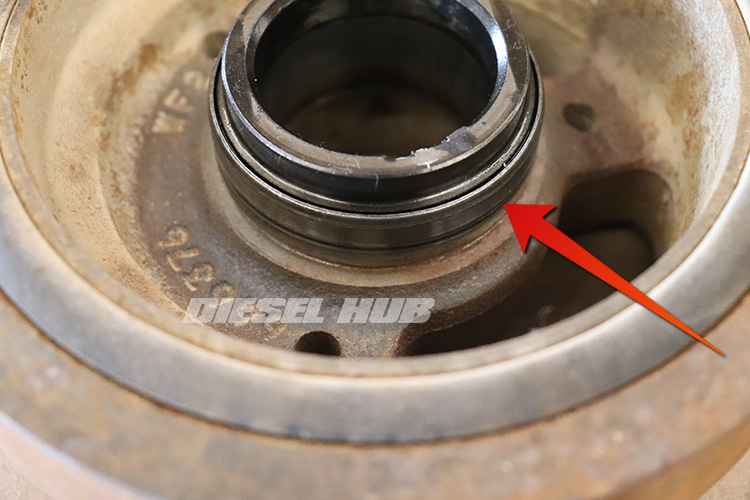
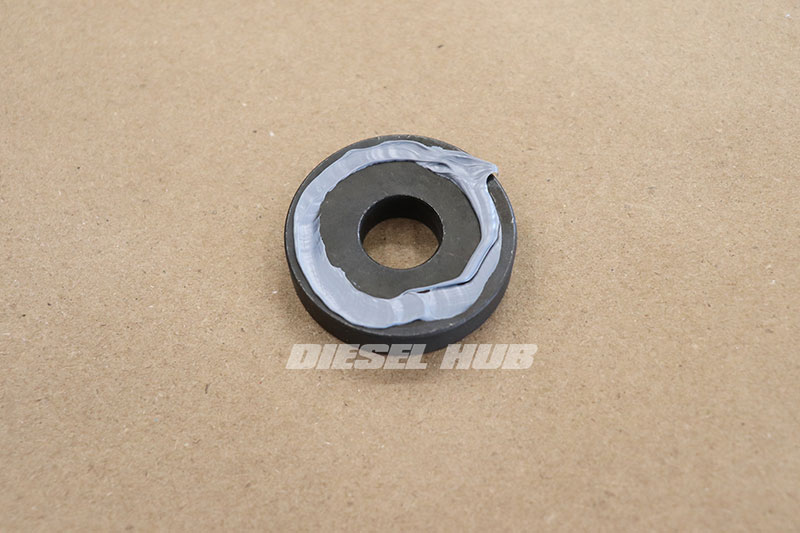
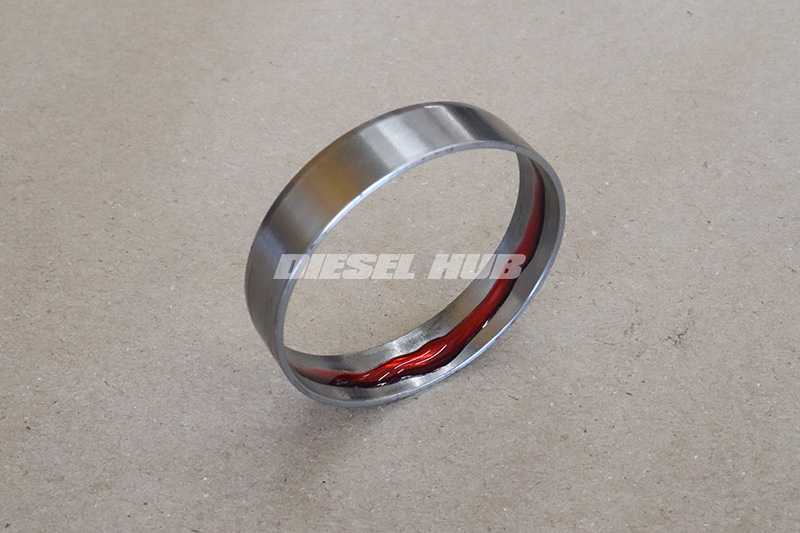
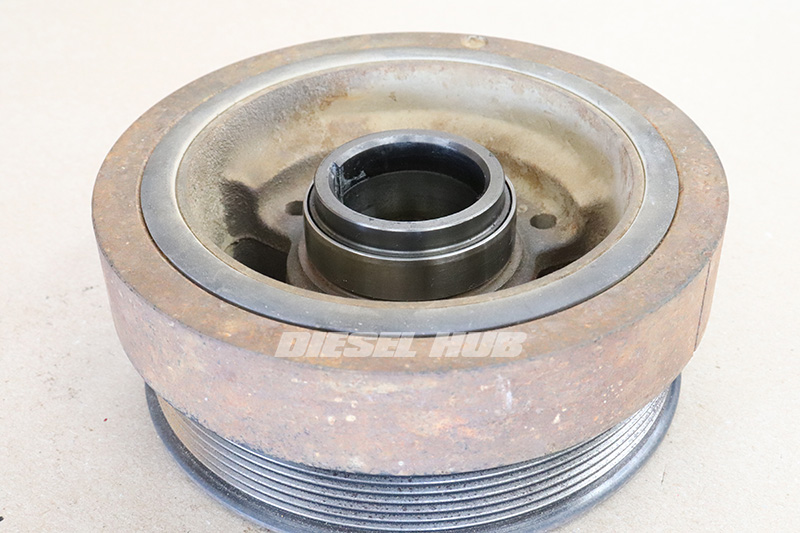
Located directly behind the damper is the low pressure oil pump (LPOP), which is responsible for engine lubrication and providing engine oil to the high pressure oil pump (HPOP). A wear ring is installed onto the backside of the damper, which rides on the inside of the front crankshaft seal mounted to the face of the LPOP housing. Figure 2 below identifies the serviceable wear ring, which should inspected any time that the damper is removed. OEM Ford replacement crankshaft dampers include a new wear ring.
Damper Parts
| Component | Part Number | Remarks |
|---|---|---|
| Crankshaft damper | Ford F81Z-6316-AA | [1] |
| Damper retaining bolt | Ford F4TZ-6A340-A | [2] |
| Damper wear ring | National 5066 | [3] |
| Front crankshaft/oil pump seal | National 3894V | [4] |
| RTV sealant | Motorcraft TA-31 | [5] |
| Wear ring sealant | Loctite 271 | [6] |
[1] - 8 rib pulley only, may not fit 1994 model year engines; wear ring comes pre-installed
[2] - Recommend replacing bolt
[3] - Replace if crankshaft damper is being reused
[4] - Recommend replacement while crankshaft damper is removed
[5] - RTV sealant is applied on the keyway and backside of the crankshaft bolt washer
[6] - Applied around the inside circumference of the wear ring before installation; not needed if replacing the damper
Preventing Engine Rotation
Although the damper has a keyway to ensure it is installed in the proper orientation with respect to the crankshaft position, it is ultimately secured to the crankshaft hub by means of an interference fit and the retaining bolt must be torqued down to 212 lb-ft after it is installed. This is an immense amount of torque and the engine will want to rotate after a certain threshold is achieved. It is therefore necessary to prevent engine rotation while this bolt is being torqued down.
There is an extremely simple solution in vehicles equipped with a manual transmission - placing the selector in a high gear (5th or 6th) and setting the parking brake provides sufficient resistance. Vehicles equipped with an automatic transmission do not have this luxury because the torque converter always allows rotation (this is why the engine can idle in any gear, including park).
For this reason, tool 303-103 (updated tool is OTC 6891) is available to secure the flexplate and prevent rotation. Using a flywheel/flexplate turner can also accomplish the same task. If one person secures the flexplate and prevents it from turning, another can torque down the crankshaft bolt.
How to Remove the Crankshaft Damper on a 7.3 Power Stroke Engine
Click any thumbnail to view fullsize, detailed image
- Set the parking brake and chock the rear tires.
- Disconnect both negative battery cables.
- Remove the degas bottle cap.
- Drain the radiator. Take into consideration that engine coolant that is collected in clean vessels can be reused if it is in good, uncontaminated condition.
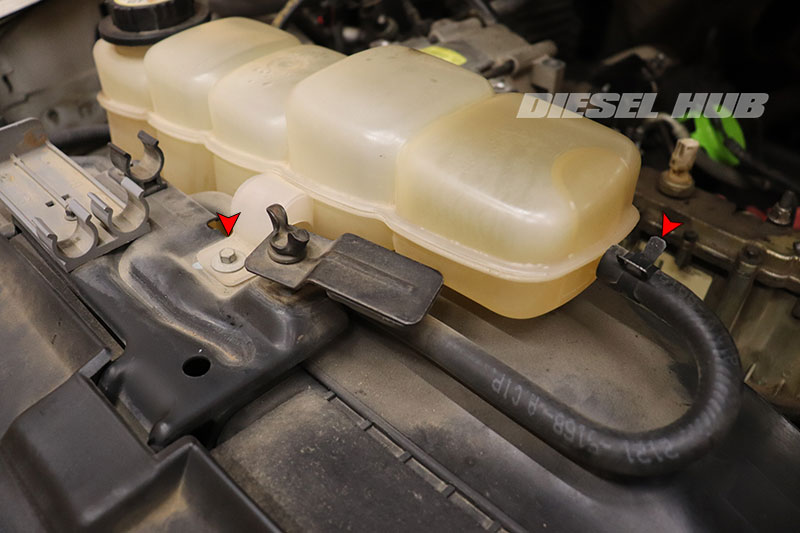
- Disconnect the upper degas bottle hose.
- Remove the degas bottle retaining bolts with an 8 mm socket. (1) mounting bolt connects to the core support bracket and (2) mounting bolts are located on the passenger side, lower corner.
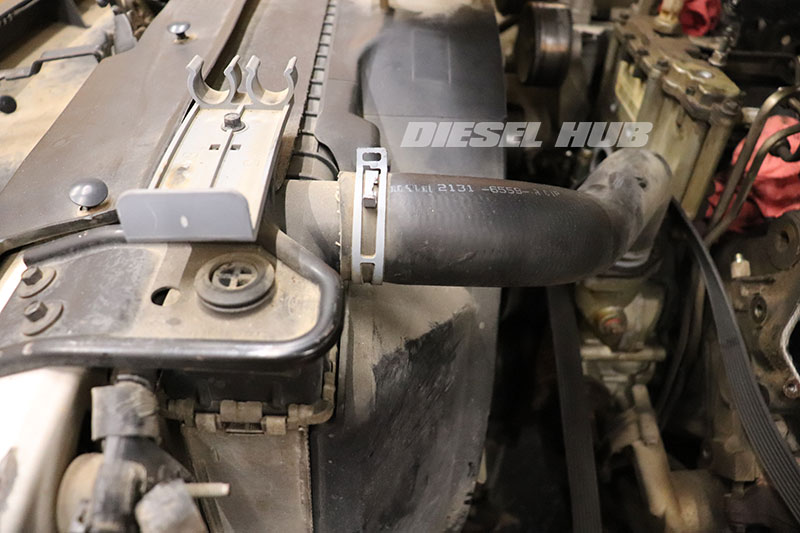
- Remove the upper radiator hose.
- Remove the lower radiator hose.
- Remove the serpentine drive belt.
- Remove the fan shroud, followed by the fan clutch and fan assembly. For additional guidance, see: 7.3 Power Stroke fan clutch removal

- Remove the camshaft position sensor. The bracket is secured by a single mounting bolt requiring a 10 mm socket.
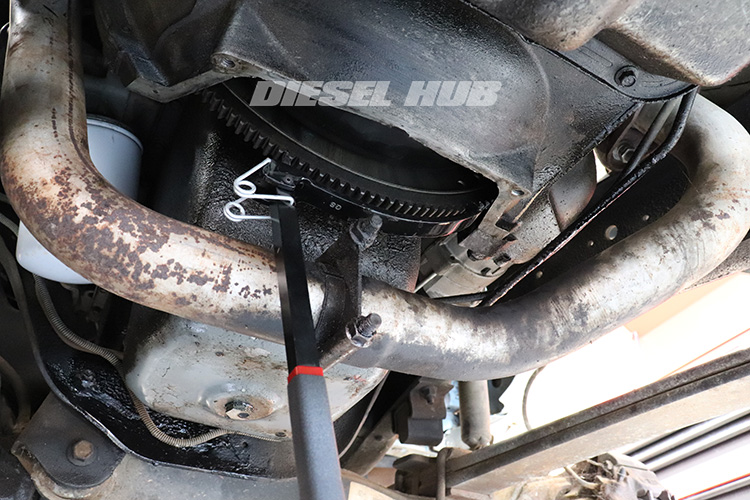
- For trucks with an automatic transmission, remove the transmission inspection cover and secure the flexplate with an appropriate tool.
- For trucks with a manual transmission, engage the transmission in 5th or 6th gear.
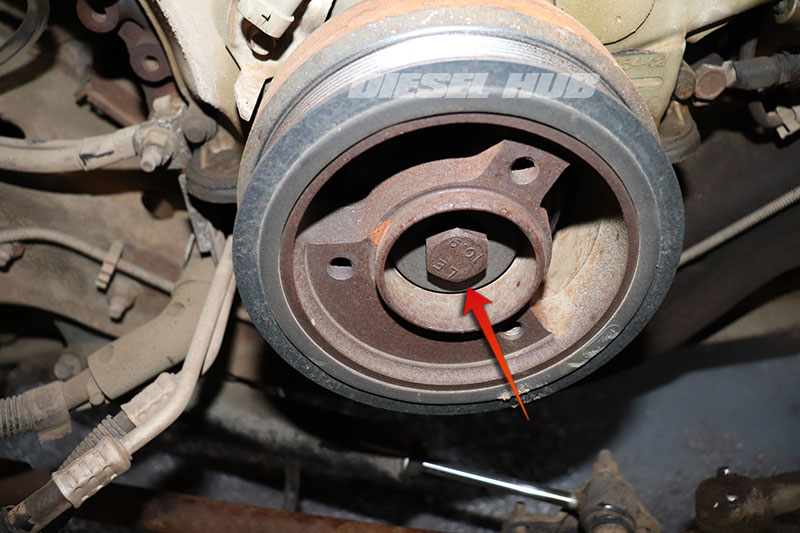
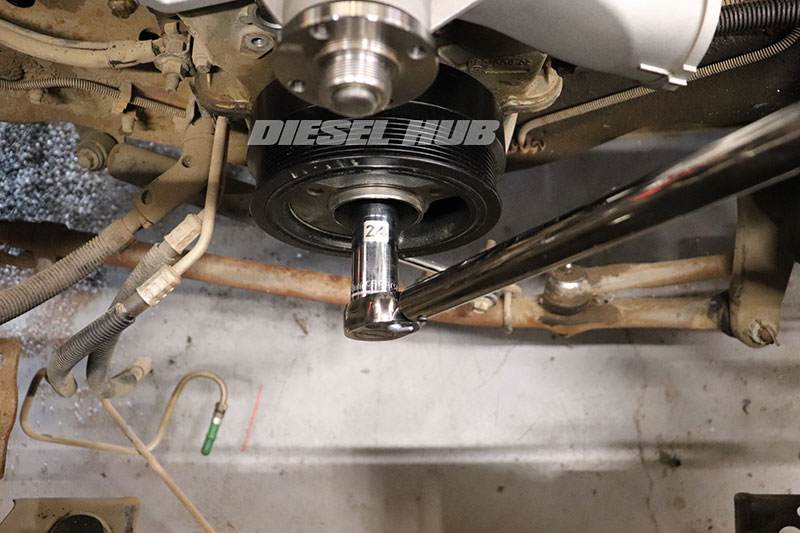
- Remove the damper bolt and washer with a 24 mm socket; this a standard rotation fastener, counterclockwise to loosen.
- An impact gun will make quick work of the bolt and shouldn't require locking the flexplate.
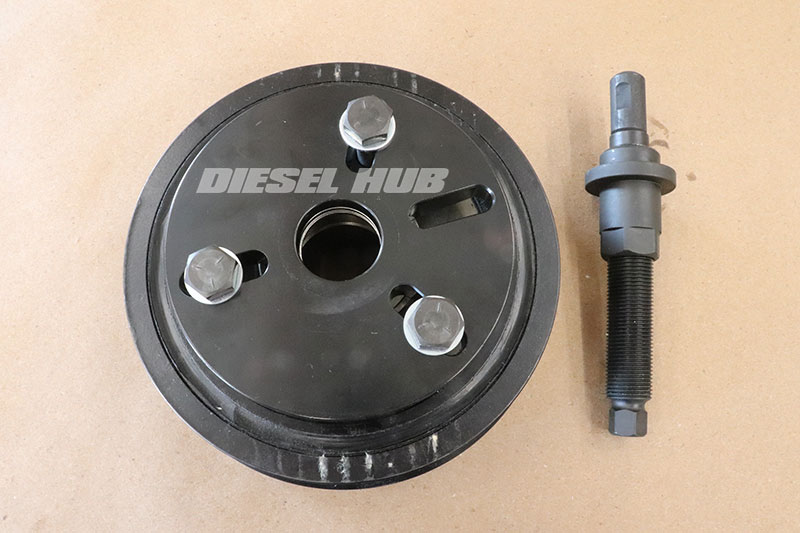
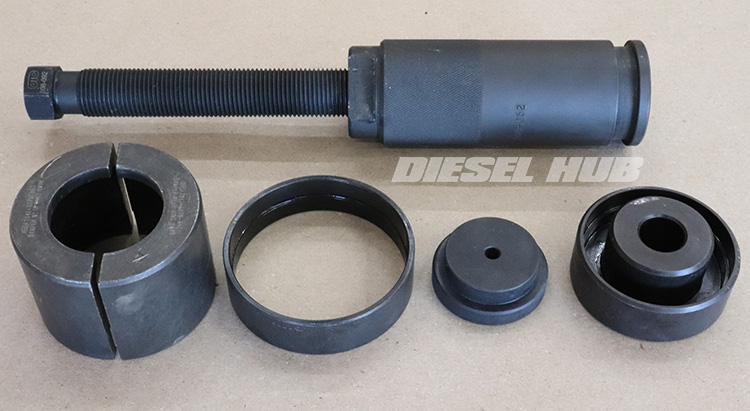
- Damper pullers can be configured in various settings for different sized dampers and a range of applications. Use the new damper to determine the correct components and fasteners from the puller kit.
- OTC 4531 shown, recommended for good quality and value; not all damper pullers will have the correct geometry or fasteners for the 7.3 liter Power Stroke engine, but this set is fairly comprehensive.
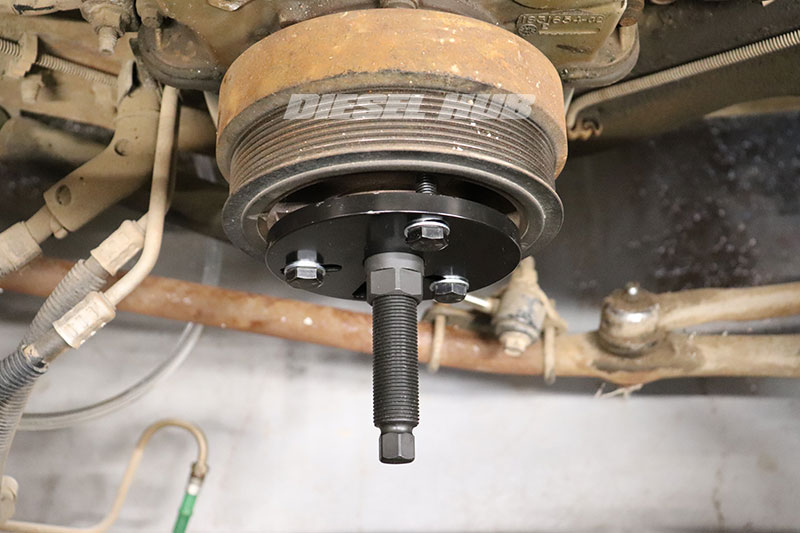
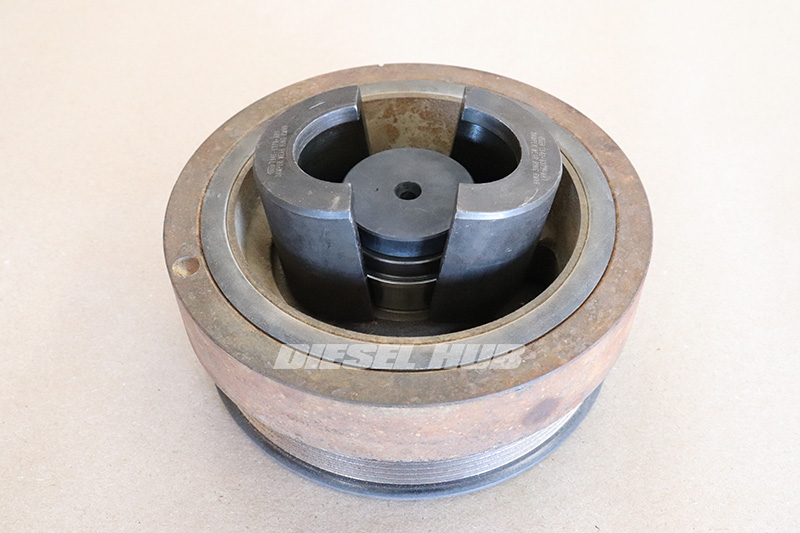
- Install the puller on the damper.
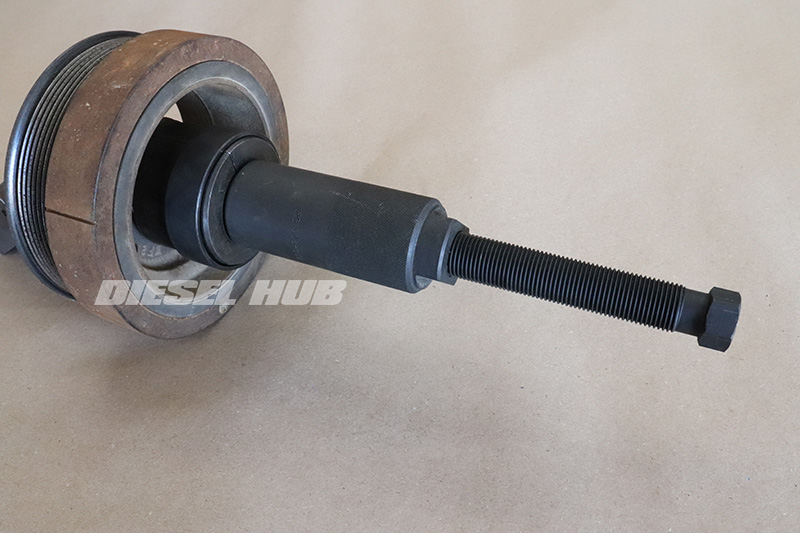
- Remove the damper. This common puller type requires that the large nut at the collar of the tool is held with a wrench while the forcing screw is rotated clockwise. This pulls the three bolt flange outwards, forcing the damper off of the shaft.
- With the old damper on a workbench, remove the puller.
- With the damper removed, we high recommend inspecting the low pressure oil pump; see: 7.3 Power Stroke low pressure oil pump removal and installation for guidance. The front main seal is fixed to the face of the oil pump housing. Now is the perfect time to tackle this procedure as preventative maintenance.
How to Install the Crankshaft Damper on a 7.3 Power Stroke Engine
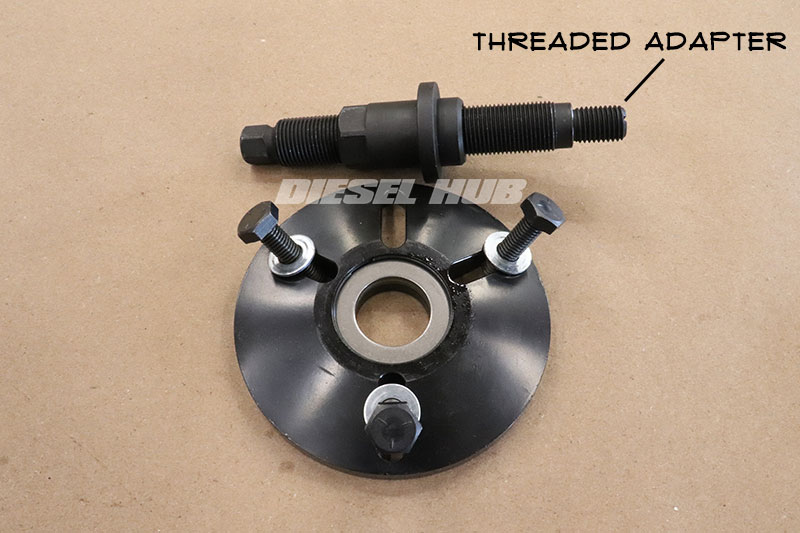
- Note that the damper puller should also double as the installation tool, but its configuration will be different. Familiarize yourself with the correct orientation and select the correct adapter that will thread into the crankshaft (same thread as the bolt that secures the damper to the crankshaft).
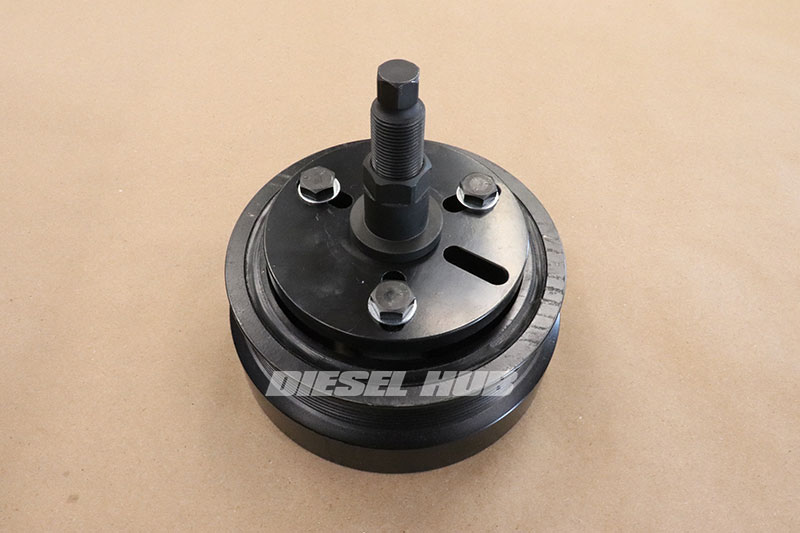
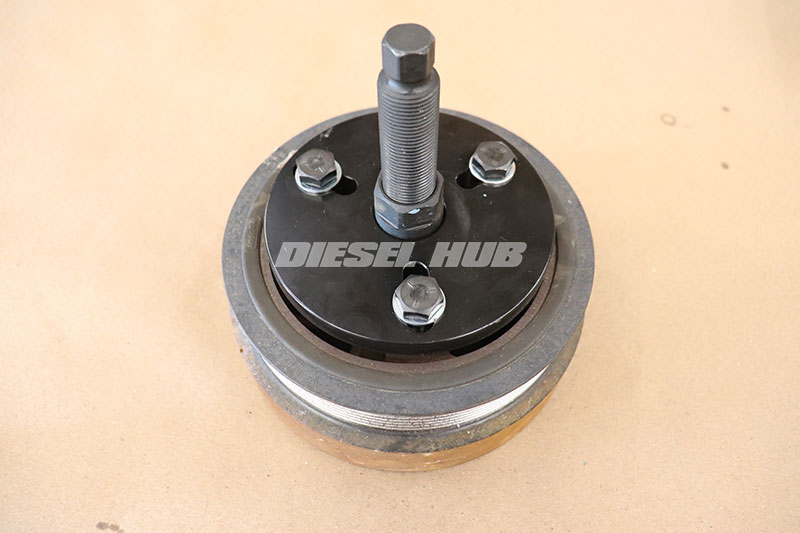
- Secure the installation tool on the replacement damper, leaving the bolts loose enough that the fixture can "walk" in the slots but tight enough that there is no slop between the fixture, bolts, and face of the damper.
- Clean any residual silicon from the crankshaft hub.
- Apply a small amount of RTV silicon sealant (recommend Motorcraft TA-31) onto the crankshaft damper keyway.
- Slide the damper over the crankshaft hub and line up the keyway.
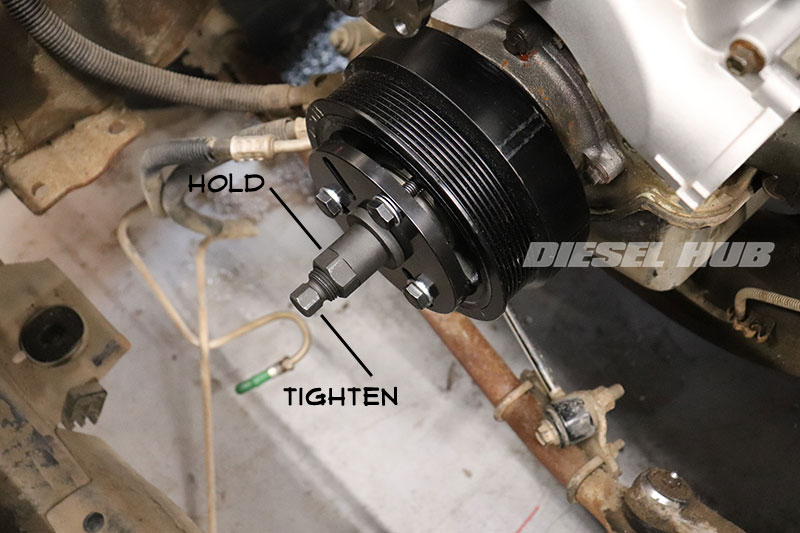
- Thread the installation tool into the crankshaft until it is fully seated.
- Hold the outer bolt head (long threaded component) with a socket/wrench and tighten the large collar nut with a wrench; the damper should slowly press over the crankshaft hub. If it is not, stop and verify that the installation tool is setup correctly, it is being used properly, and the keyway is lined up.
- Continue pressing the damper onto the crankshaft until the damper stops against the hub; you will feel that it cannot be tightened anymore.
- Apply a small amount of RTV silicon to the rear face of the damper retaining washer.
- Install the damper bolt and washer. The silicon on the washer should contact the face of the damper, not the head of the bolt.
- Torque the damper bolt to 212 lb-ft. On trucks equipped with an automatic transmission, the flexplate must be secured or the engine is eventually going to spin indefinitely before reaching the torque spec.
- Install the remaining parts that were removed in reverse order.
- If the low pressure oil pump was replaced, change the engine oil and filter before starting the engine.
How to Replace the Crankshaft Damper Wear Ring
The crankshaft damper has a serviceable wear ring that needs to be replaced with the front crankshaft seal. Ideally, the front crankshaft seal and wear ring should be replaced anytime that the damper is removed. Since the rotating wear ring is in constant contact with the stationary front seal, a small groove becomes worn into the outer circumference of the wear ring - this is its purpose, to prevent the machined surface of the damper (a much more expensive part to replace) from wearing.
The wear ring is pressed and adhered over the rear neck of the damper. A special set of tools is required to remove and and install the wear ring. Unfortunately, the tool set is somewhat expensive for the average person working on their own vehicle; you'd be money ahead just replacing the damper, which comes with a new wear ring installed.
The removal and installation tools pictured in figure 4 above are as follows:
- OTC T94T-6379-AH1, wear ring remover collet
- OTC T77F-7025-C, collet sleeve
- OTC 8064, step plate adapter
- OTC 308-052, remover tube
- OTC 308-092, force screw
- OTC T94T-6379-AH2, wear ring installer
The equivalents of some of these OEM tools are available in generic kits at reasonable prices. There are limited economic alternatives to the OEM wear ring removal and installation tools, but if a new damper is being used the wear ring comes pre-installed.
It is entirely possible to remove the wear ring without this tool set. Wear rings can be removed in a similar fashion as bearing races by welding a bead around the circumference. Heat causes the wear ring to expand and the added material distorts the original shape enough to free it with little effort. The installation tool, however, should be used to ensure that the wear ring is seated to the proper depth as this is critical.

- The wear ring is positioned over the rear of the crankshaft damper shaft. With the damper removed, determine that condition of the ring by running a fingernail across the width of the surface. If there is a groove worn into the wear ring, replacement is recommended to assure a positive seal with the front crank seal.
- Install the wear ring removal collet and step plate adapter.
- The lower lip of the collet must be positioned below the lower edge of the wear ring before closing it.

- Close the collet around the corresponding neck on the remover tube, then install the collet sleeve to "lock" the two halves.
- Secure the remover tube while tightening the force screw.
- Chucking the tube in a vice is useful, a fair amount of torque is required to remove the wear ring.
- Continue tightening the force screw until the wear ring releases.
- Clean and inspect the neck of the damper before installing the new wear ring. Any burrs of rough spots should be sanded down lightly to ensure smooth installation of the new ring.
- Apply a small bead of Loctite 271 to the inner circumference of the wear ring. To ensure a leak free installation, the wear ring needs to be sealed to the neck of the crankshaft damper.
- Orient the new wear ring over the neck of the damper. Note that the tapered end of the wear ring must point into the crankshaft seal (away from the front of the damper).
- Position the wear ring installer over the wear ring.
- Press the wear ring into place with an arbor press or install a puller from the front side of the damper to seat the wear ring. Do not pound or beat on the installation tool - it must be seated evenly.
- Verify that the wear ring was properly (and evenly) installed and was not damaged.
- Clean up any excess adhesive that may have been squeezed out during the installation process.

